|
-
20th November 13, 11:54 AM
#1
My kilts to long and I want to shorten it. I need advice
OK, so I have a kilt that was supposed to be 24.5 inches long and I've measured it and it's 25 inches long. It's a new kilt, but it's been months since I received it from the kilt maker, and I was so happy to have it, and didn't check the length because I just would have never suspected that it wasn't right. OK, so much for my trusting nature........as of NOW, I'd like to have it shortened to 24 inches.
I've worn it about 4 times and it always felt "substantial, and kind of long". Today I decided to get it out and actually measure it, and sure enough it measured at a flat 25 inches.
My question is "do I hem, or do I contact a Kilt maker" for the work. If I send it to a kilt maker does any one have an idea as to the cost, and what's the turn around time? The kilt I'm talking about here is a 16 oz. 7 yard kilt.
I'm not really sure where to start on this deal. All help would be appreciated.
Thanks
Stan L.
-
-
20th November 13, 12:07 PM
#2
This is one of those questions that we really can't answer without just a little more information.
Do you know the kiltmaker? If you don't know the actual person who sewed your kilt can you tell us where you bought it?
Is your kilt hand stitched, machine stitched or a combination of the two? Can you see a line of machine stitching at the edge of each pleat where they are sewn down and tapered?
When you wear the kilt is the bottom of the Fell in the right place? The Fell is the area in the back of the kilt that is sewn down and tapered. The bottom of the Fell should hit you at the crest of your hips or butt or perhaps an inch higher.
Is your kilt designed to be worn up, at the natural waist? To find out fold the kilt in half and look at the Fell area. Is the smallest part of the kilt at the level of the top straps and buckles with a flare above, or is it a continuous taper up to the top of the kilt?
Steve Ashton
www.freedomkilts.com
Skype (webcam enabled) thewizardofbc
I wear the kilt because: Swish + Swagger = Swoon.
-
-
20th November 13, 01:51 PM
#3
Steve, first off thank you for your reply and time.
Yes the fell is in the right place. NO, you can't see the pleat stitching. It was meant to be worn in a traditional high natural waist manor. I don't know the kilt maker and I'm suspect that this company subs out the kilt making to independent kilt makers.
When I fold the kilt in half putting apron fringed edge, to inside outer edge the kilt is strait to the buckles, and then it has a continual curve to the folded edge. I'd say that there's about a 3/4 to 1 inch rise (maybe less) from the start of the curve to the end of the curve which runs from buckles to the fold
I have 5 kilts from this company, and the other 4 are absolutely perfect and works of art. So is this one, it's just to darn long. Or (and) I should say " it's longer than I requested". If I had noticed the error in the first month of so of delivery or so, I'm suspect that the company's customer service may have done something for me, but (to me) that time has passed, and (at least as far as I'm concerned) that's water under the bridge.
Steve, thanks again for your response, and help.
Stan L.
-
-
20th November 13, 02:27 PM
#4
Thanks Stan,
OK, then as long as the bottom of the Fell is in the right place, and you are talking about a 1" shortening job it will be pretty easy to fold in a hem to the kilt.
You will need a good steam iron, pressing cloth (a pillow case works well) and some matching thread.
Use a blind hem stitch or a catch stitch.
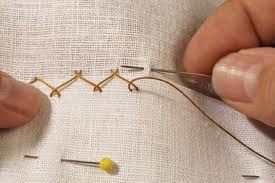
Also please see this thread by Barb on how to deal with the little parts of the hem that will stick down below the aprons.
http://www.xmarksthescot.com/forum/s...ad.php?t=40778
-
-
20th November 13, 02:38 PM
#5
Thanks for your help Steve.
Do you think that this is a job that a "non-Scot" tailor should be able to handle, or do I need to gear up and do it myself? I'm a leather repair guy who does (some) hand stitching on leather, and fabric now and then. I learned to sew a bit a Looooong time ago ( I made a shirt and pair of pants via the pattern).
What you you think? And I'm going to the recommended thread too. As I look at the photo of Barb stitching the hem in the photo, this kind of work is easily with in my skill set.
Thanks again.
Stan L.
Last edited by Stan; 20th November 13 at 02:40 PM.
-
-
20th November 13, 03:07 PM
#6
Oops, sorry about posting with the wrong signature block.
Putting a hem in a kilt is not a hard job. It does take some patience and time. You will be sewing a very long hem.
Almost any person with average hand-eye coordination should be able to sew a hem.
The first step is to carefully remove the apron tip stitches.
Then look at the apron edges. Pay careful attention to how the right apron edge is done. In some cases you may need to trim away a small piece of the fringe. Open the facings on the apron edges.
Then steam out the pleat creases in the bottom 4"-5" of the entire kilt.
Turn up your hem, watching closely at the alignment of the Tartan pattern, and press down the new hem. Use lots of steam and lots of pressure. Let the fabric cool before moving it or going to the next section.
Wax up some matching Polyester thread and go to work. I use Gutermann Polyester thread which can be found in almost any major chain sewing store. Avoid cotton wrapped thread.
When choosing the color for your thread take along a small piece. (From the cut-away fringe perhaps) Get the closest color you can but don't fret if you can't match exactly. A good rule of thumb is to go one shade darker if you must.
I start at the apron facings. I fold up the hem and then fold the facings back into place. Stitch these down at the top, the inside, and at the bottom to close it up if necessary.
I work my way along the entire hem, catch stitching carefully. Every so often turn the kilt over and make sure your catch stitches are not showing from the outside.
You can now sew up the apron tips again. Some people turn them up and some tuck them inside the hem you just folded.
The last thing is to baste the pleats back into alignment and press the creases back in. Work carefully on your basting. Use a tape measure to insure your creases are in the same places they were all the way down each pleat.
Lay your kilt on the floor with a bath towel underneath and press the creases back in.
All you need to do now is put the kilt on and brag that you did it yourself.
Steve Ashton
www.freedomkilts.com
Skype (webcam enabled) thewizardofbc
I wear the kilt because: Swish + Swagger = Swoon.
-
The Following 2 Users say 'Aye' to The Wizard of BC For This Useful Post:
-
20th November 13, 08:15 PM
#7
Thanks Steve, I can do all of those procedures. I'll practice "the stitch" on some garment (or fabric) that's less valuable than the kilt to start getting my skill set up to par prior, and then I'll go for it.....
Thanks again for all your help.
Stan L.
-
-
21st December 13, 05:14 PM
#8
Hi, and I just thought that you all might like to know that "I DID THE JOB"...LOL... I read all the recommended threads, and watched a few you-tube videos on sewing by hand, and the jumped in with both feet...LOL.. It took about 6 hours of hand work to get my 7 yard 16 oz. kilt hemmed.
Tools used:
Steam iron, needles, matching thread, scissors, strait pins, tailors tape measure, one "to long kilt", and a bucket load of COURAGE AND DETERMINATION...LOL...
Step 1.
To start off I needed to buy a good quality steam iron. I bought one for about 30.00. In addition to simply putting it on the "steam setting" and having it make a LOT of steam, it also has a button on it that gives a burst of steam that's strong enough that it will (literally) lift the iron off the fabric. It was a great tool.
Step 2. was to take my MacGregor modern hunting to the fabric store and match the thread..
Step 3. was setting up a fold out 28" X 60" folding table in my living room so I could have acquitted work space.
Step 4. sit down and figure out how to start the project.
Starting the project was probably the most time consuming, and thought provoking. Looking at the fringed edge and getting that multilayer area to look professional and "unmolested" was the first challenge. My kilt has three rows of fringe on it, and while I did my best to remove the existing stitches with a seam ripper, the fringe didn't get out unscathed.
In that process I did cut out a bit of fabric so that when I folded over (folded up) the fabric to remove the one inch of length, and when I finished it looked really nice and "UN-findable". After I figured that first part out, it just turned into an endurance test. It kind of reminded me of running, in that after getting warmed up with that first 2+ feet of hemming. and figuring out how to work with those first few (of 27) pleats, it was pretty much, "steady as she goes"..
Going across the front apron with my newly learned "hem stitch" it became pretty routine. I'd start off a on the new (un-hemmed) section by steaming the apron, and then steaming the pleats out of the material. I steamed the material up about about 2-3 inches from the salvaged edge. Then I'd measure the 1 inch up that I was removing with the hem, then pin that section in place (to the right measurement) and then steam press that area again to set the hem line.....These steps were simply repeated over and over until I got the end.
As I sewed away, I looked as each, and every stitch as a chance to do better, and make the job the best job that I could do. Well, needless to say, it turned out really nice, and now I have a kilt that's the right length.
It wasn't a fun project, and it wasn't a hard project. I'd say that the best part about doing it myself, was that I didn't have to wait for any one to "help me", and I doubt that any one (around here) would have done a better job. The hem, and stitches are invisible on the outside of the kilt, the line is strait, and job is finished. What more could I ask for??? Not much, I guess.
I've tried to insert several (about 7) photos, but don't' seem to be able to get that done.
Thanks again for all your help, and my kilt looks great.
Stan L.
Last edited by Stan; 21st December 13 at 05:18 PM.
Reason: trying to add photos, but cant seem to get that done.
-
-
21st December 13, 05:31 PM
#9
Well, I did the job, and it came out great. It took about 5-6 hours of work to hem my 16 oz., 7 yard kilt. It wasn't a hard job, it was just a long job. I'm suspect that I did about as good a job as could be done. It's even, the pleats are sharp, and none of the stitching is visible from the outside.
Steve, thanks again for all the help, and advice.
Here's a few photos of my efforts.
photo 1.jpg Photo 2.jpg Photo 3.jpg Photo 4.jpg photo 5.jpg photo 6.jpg
DSCN1869.jpg
Last edited by Stan; 21st December 13 at 05:32 PM.
-
The Following 3 Users say 'Aye' to Stan For This Useful Post:
-
23rd December 13, 03:59 AM
#10
Well done! I'm not sure if I would have had the courage to do something like that!
-
 Posting Permissions
- You may not post new threads
- You may not post replies
- You may not post attachments
- You may not edit your posts
-
Forum Rules
|
|


Bookmarks