|
-
22nd April 12, 06:59 PM
#1
Found a good, simple waistcoat pattern
I have some PV tartan earmarked for a bias-cut waistcoat, so I went looking for a pattern without any shaping on the front, so there will be no darts to break up the tartan.
I found one that has the added bonus (for me) of being about as simple as it gets :
Simplicity 2346, variation A (minus the tacky appliques, unless that's your thing.)
The pattern comes in two sizes: AA (which covers sizes 34-42) and BB (sizes 44-52). Variation A includes one left patch pocket. It wouldn't be hard to make a duplicate right pocket, but I opted to leave it off altogether.
I spent most of today working on a waistcoat of Murray of Atholl ancient PV tartan from Marton Mills with black cotton sateen for the lining and back (the pattern and instructions assume you'll be using the same color front and back.) It went together pretty quickly and easily (the instructions are good, and pretty much all of the sewing is done by machine) and I would probably have finished it by now, if I hadn't realized after trimming the seams and turning everything right-side out that I totally bungled the tartan alignment, despite what I thought was careful planning and triple-checking.
Hindsight is always 20/20 of course - I wasn't taking into account the ABAC repeat of the tartan, I did not adequately account for the overlap for the buttons, and I totally forgot to take the 5/8" seam allowance into account. Good thing I bought extra tartan, almost like I expected a goof-up first time out. Before attempt number two I'll probably do some small-scale tests to make sure I lay the front pieces out correctly next time.
However, you can get a sense of what the finished waistcoat would look like from the photo below - I didn't bother pressing the seams and the sides are only pinned, but when I tried it on as-is it fit pretty well... The pattern is definitely a keeper, and a nice weekend project:

Last edited by usonian; 22nd April 12 at 07:01 PM.
-
-
22nd April 12, 08:58 PM
#2
I documented a similar project recently, here's the link:
LINK
The first post has a link to an even earlier thread where I think we talked about vests with no front darts. Glad you found one on your own! Sorry you had that mishap with the alignment, I feel your pain. . .
Proudly Duncan [maternal], MacDonald and MacDaniel [paternal].
-
-
23rd April 12, 05:24 AM
#3
Thanks for the link sydnie, I missed that thread first time around! Really good documentation, especially on the welt pockets. I'll tackle those someday, but not on tartan first time out  . Can I ask how much you shortened the pattern? I've read conflicting things here; I hadn't altered the pattern at all, but I know I've seen some discussions about shorter waistcoats. I suppose it depends on the jacket that would be worn with it... I'll have to try it on with my spencer jacket and see how it looks. . Can I ask how much you shortened the pattern? I've read conflicting things here; I hadn't altered the pattern at all, but I know I've seen some discussions about shorter waistcoats. I suppose it depends on the jacket that would be worn with it... I'll have to try it on with my spencer jacket and see how it looks.
Last edited by usonian; 23rd April 12 at 07:09 AM.
-
-
23rd April 12, 07:06 AM
#4
Definitely depends on the jacket. I cut the fronts and back out of muslin first, basted them at sides and shoulder, and had Bob try them on under his current formal jacket. That helped me establish length and neckline.
Now he has a new PC, and the bias vest doesn't work -- too long, wrong neckline -- so it looks as if I might end up making another one after all!
The thread I linked doesn't have the discussion of pattern that I thought it did. But like you, I found a pattern with no front darts, all the shaping is in side and center back seam.
Proudly Duncan [maternal], MacDonald and MacDaniel [paternal].
-
-
25th April 12, 02:36 AM
#5
Working fabric on the bias is always difficult.
For patterned fabric I cut out several copies of the front piece, place two on the fabric where I intend to cut then take a third copy and mark the significant elements of the pattern of one side, then turn it over and put it onto the other piece to make sure that they are in the same place on the other side. Even then I tend to leave extra material at the front edge for fine tuning, and a deeper fold when working on the bias is a good idea, so if you can have extra at the side seams too they will be more secure. Although the bias cut fabric is more flexible so there is less strain the cross cut edge can be more inclined to fray than a straight cut one. I turn under a small fold and sew it twice of straight-ish seams before I start to assemble the garment - on curved seams the instability helps with getting the seam allowance to lie flat, but even then I sew the seam and then sew through the seam allowance and then through the lining or facing.
I tend to be a pessemist when joining things together.
Anne the Pleater :ootd:
Last edited by Pleater; 25th April 12 at 02:38 AM.
-
-
21st September 12, 07:46 PM
#6
There's nothing like a deadline to motivate a person. Back in May I was working to finish my Murray of Atholl kilt and a jacket conversion in time to make a presentation to the 12th Duke of Atholl on behalf of my Masonic lodge, and then I got distracted by other things over the summer... until suddenly my installation as Master of my lodge was only a week away and I still hadn't gotten back to the vest. But I pulled it off!
This time I got all three factors right when laying out the tartan fronts on the bias: the ABAC repeat of the tartan, the seam allowance, and the button overlap. I aligned the center of the tartan pattern to the exact center of the button holes based on the pattern, but in hindsight I can see that some offset would be necessary to get the tartan pattern to align perfectly symmetrically on both halves of the front - on my second attempt the pattern is about 1/2" from being symmetrical. I don't think anyone outside of this forum is ever going to notice, though.
On my second attempt I made muslin copies of the major pattern pieces, and shortened them by 3 inches, which was definitely a good call - the length works well with both my spencer jacket and my converted jacket. It winds up being a 3 button vest.
I managed to get it finished in time for the installation! I still need to get photos of it without a jacket, but in the meantime here's a photo from fellow X-Marker and Brother Peter Crowe, who drove across the state to attend the ceremony.
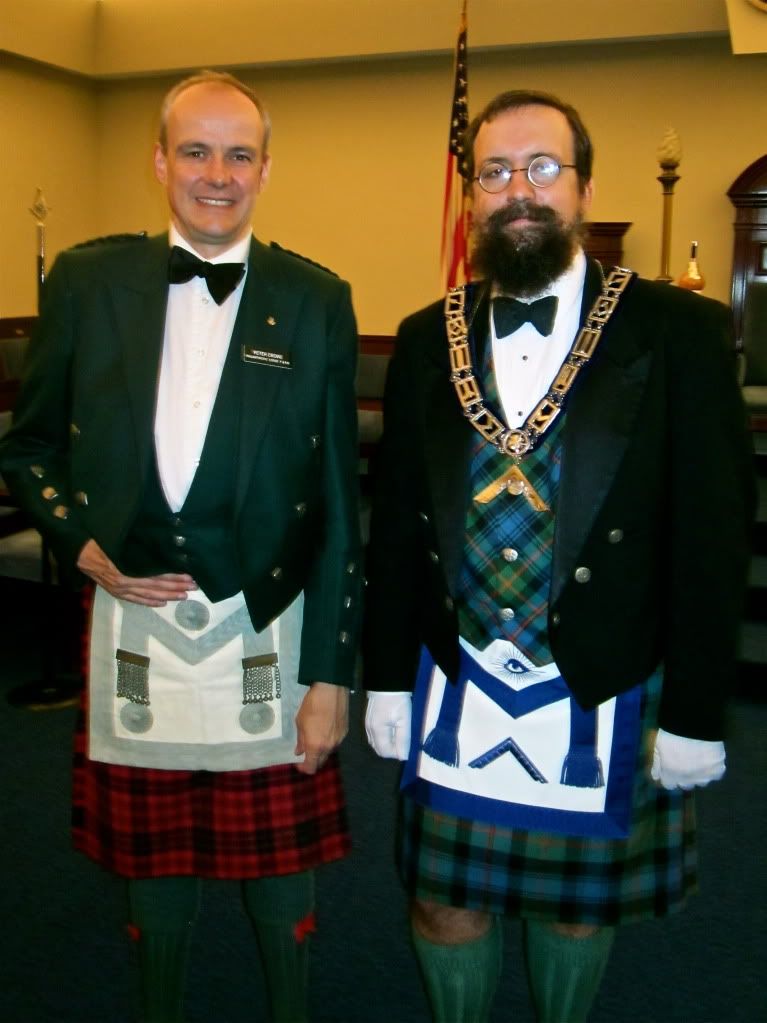
I'll definitely be making this pattern again... I think perhaps a tweed is called for next. It goes together quickly and easily, but looks pretty nice when finished.
Last edited by usonian; 21st September 12 at 07:59 PM.
-
-
22nd September 12, 09:00 AM
#7
That looks great, nice job with a complex tartan!
If I understand your description of buttonhole alignment, remember that (unless you are really skinny) when you wear it the buttons will tend to move over to the far edge of the hole, not stay nicely centered. I think that is what you found out, just restating it for others who may be tackling a vest for the first time.
The Lodge "bling" really makes it pop, too!
Proudly Duncan [maternal], MacDonald and MacDaniel [paternal].
-
-
22nd September 12, 01:46 PM
#8
usonian every nice work and thanks to sydnie7 for the tutorial.
I was just watching on youtube an interesting video on an easy way to make a double welt pocket. This method seems to be easier than what I was taught. It also looks like it could easily be modified to a single welt pocket.
Well back to youtube for easy single welt pocket.
Last edited by Friday; 23rd September 12 at 12:54 AM.
Reason: add link to video
-
-
22nd September 12, 09:34 PM
#9
Fantastic, you really did hit it spot on, and all the more impressive with the complex sett. Congratulations on hitting the next step in tartan matching. Best wishes for the future.
 Originally Posted by Friday

usonian every nice work and thanks to sydnie7 for the tutorial.
I was just watching on utube an interesting video on an easy way to make a double welt pocket. This method seems to be easier than what I was taught. It also looks like it could easily be modified to a single welt pocket.
Well back to utube for easy single welt pocket.
Another tip for those out there reading: I find that actually drawing a few key lines from the sett onto the pattern pieces helps with the matching. It helps with the front matching but really is essential with the welts. Draw the lines across the entire front pattern and it will show exactly where they cross the welt. Then copy that onto the welt pattern. Move the welt pattern around the fabric until they again match. Then just don't turn the piece one just cut out upside down. I also cut more seem allowance on the welt for more ease getting the piece to line up when doing the actual sewing.
Elf
There is no bad weather; only inappropriate clothing.
-atr: New Zealand proverb
-
-
23rd September 12, 05:21 AM
#10
Thanks everyone! It was a pretty gratifying project.
Originally Posted by sydnie7
If I understand your description of buttonhole alignment, remember that (unless you are really skinny) when you wear it the buttons will tend to move over to the far edge of the hole, not stay nicely centered. I think that is what you found out, just restating it for others who may be tackling a vest for the first time.
Actually, when I attached the buttons I did place them towards the edge of the buttonhole to avoid the problem you described, more or less. It's the overall position of the pattern in relation to the front of the vest as a whole that's off by a bit - you can see it in the photo if you look at the bottom edge on the right, just below the last button; that red stripe barely catches the edge on that side, and misses it altogether on the left side. Looking at other bias-cut tartan vest photos, I've seen them executed in such a way that both halves of the front are perfectly symmetrical.
-
 Posting Permissions
- You may not post new threads
- You may not post replies
- You may not post attachments
- You may not edit your posts
-
Forum Rules
|
|


Bookmarks