|
-
13th January 13, 02:37 PM
#1
Jacket conversion with EZ epaulettes and pocket
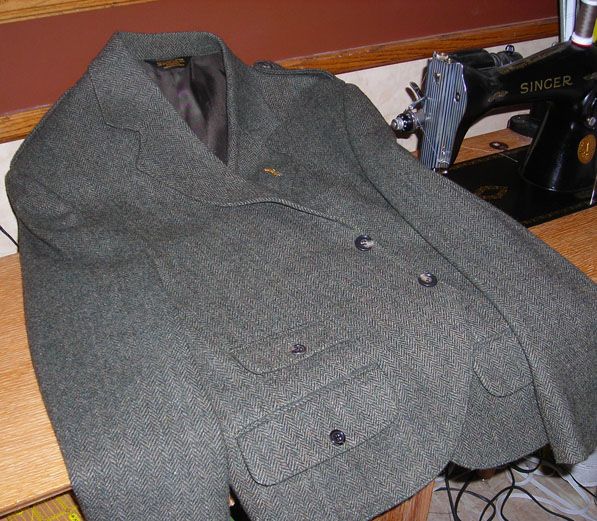
I've learned a lot from reading various how-tos on this forum and thought it was time to return the favor, if only in a small way. I've had a dark green/black harringbone tweed jacket hanging in the closet that was in need of some serious elective surgery. Through the various posts here I got a rough idea of what I wanted—a kilt jacket with epaulettes and plain cuffs that could be worn out in public without too much embarrassment. First, the finished product.
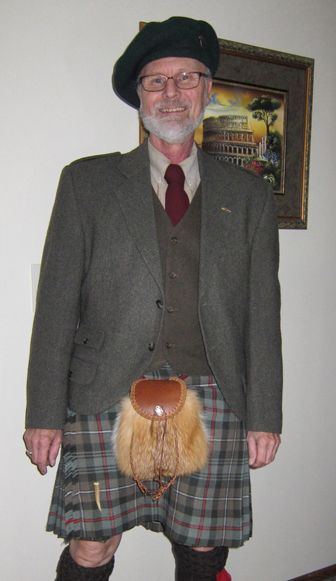
My aim with this project was to make the modifications in a way that gave me the look I wanted without overreaching my skill set (I'm still at tailoring 101.) I started with a 3-button jacket because I like the higher collar and there was no back vent to contend with. I also wanted to add the ticket pocket because I like the retro look and for reasons I will explain later.
The epaulettes
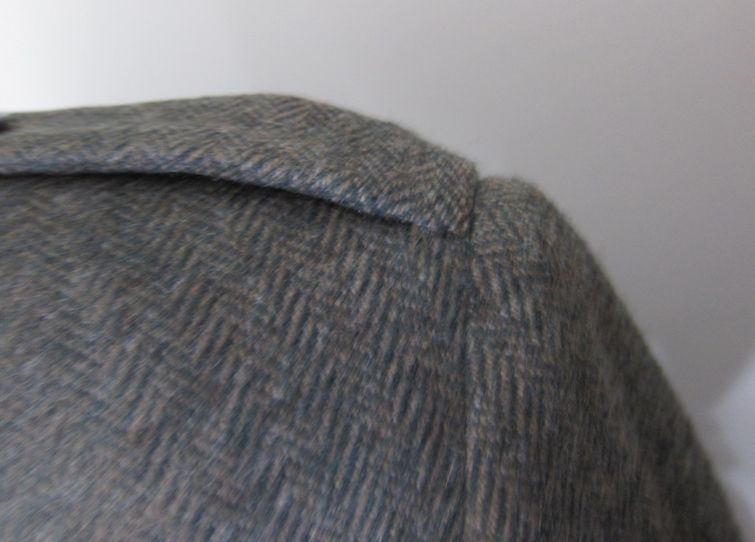
Many conversions add these by tearing into the shoulder seam, and the result can be quite handsome. However, I didn't want to jeopardize the integrity of the jacket by ripping out a seam I wasn't comfortable in replacing. My solution, tacking on an epaulette in a way that would appear to be an integral part of the jacket rather than an add-on.
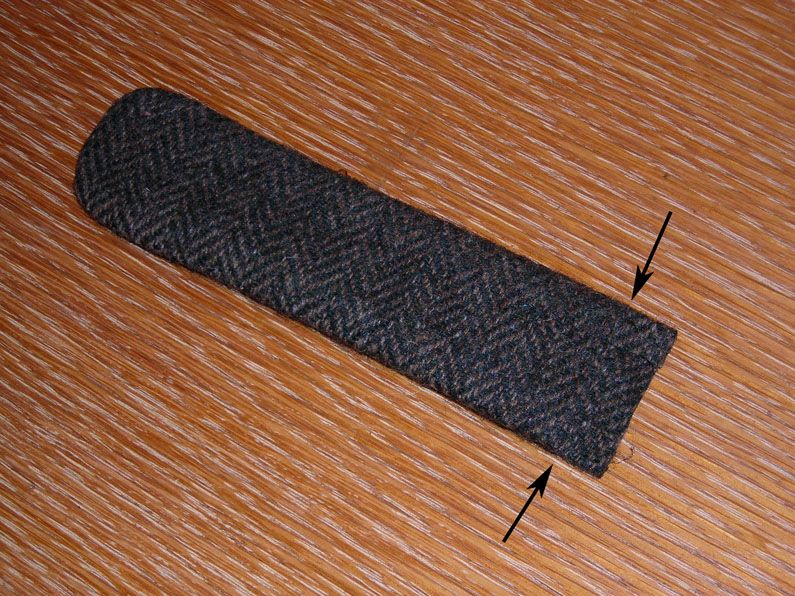
Starting with four pieces of material 2 in. by 7 in. salvaged from the bottom of the jacket, pair two of them with one on top of the other with the outsides facing each other. Chalk a semi-circle at one end. Stitch the two pieces together along the long sides about 1/4 inches in for the edge and along the line you have drawn, leaving the other short end open. Repeat for the other epaulette. Now, turn your epaulettes right-side out and press. The finished epaulettes are 1 1/2 inches wide. Determine the length you want for the final epaulette and cut your two epaulettes 1/4 inch longer. Now open up the seams until you can cut one side 1/4 inch shorter than the other. (Image below is looking at an epaulette from the bottom side.)
Now, place an epaulette upside down along the shoulder seam facing outward so that 1/4 inch tab of extra fabric lies just inside the seam and sew in place, tight into the seam. Sew the rest of the tab to the shoulder of the jacket. Finally, flip the epaulette right side up and blind stitch the edges in 1/4 inch to camouflage the tab. Finish with a button at the other end. (If you're really fastidious, you will have added button holes. Since my 1953 Singer and I only know one stitch, we just moved on.)
(Note to self: If you're doing a long post here, do it in pieces. I was automatically logged out last time I tried this.)
Now the pocket
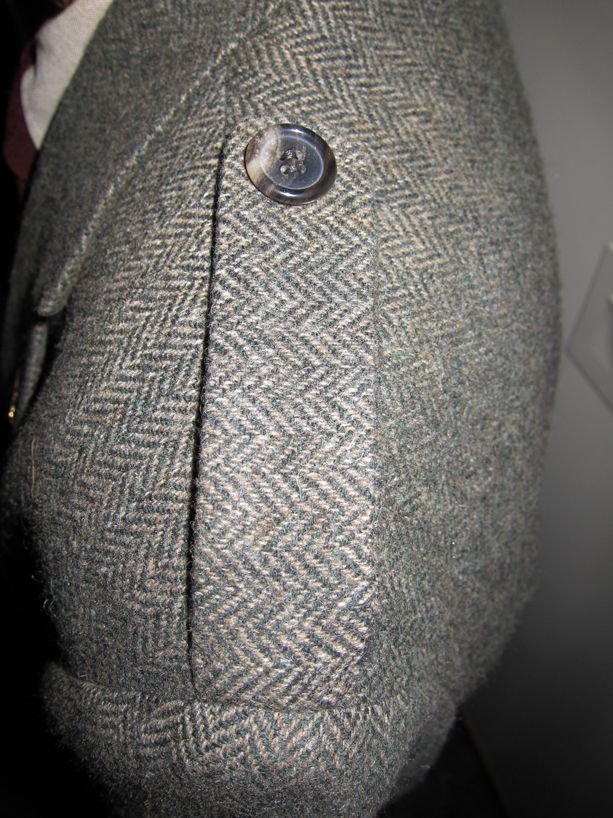
First, an admission—it's only a pocket flap. (Then again, it's a common practice, and I've got another sport coat with this feature to prove it.)
I've always liked the look of a ticket pocket on a jacket, but I added it for a second reason. Stealing a cue from magicians, it adds a bit of misdirection. It draws the eye away from the fact the main pockets seem a bit too low and makes them look more natural—at least to me.
This has to be done before the bottom of the jacket is closed up.
Start with a rectangle of sacrificed fabric 1/2 inch wider than the finished pocket and about 5 inches long, making sure the twill pattern matches the front of the jacket. With the outside of the fabric facing you, turn up one of the short sides the height you want your pocket to be and press it against the rest. Now run a seam 1/4 inch in from each side, forming a small pocket. Turn this pocket right-side out and press. The long side becomes the outside of your pocket flap.
To replicate the welt on the main pockets, turn back the long side along the point where the two sides meet and press. Then run a line of stitches down 1/8 inch from there. Fold the long side back over itself and down the back of the flap and press again.
Determine where your flap will finally be located and chalk a line where the top of the pocket will be on the front of the jacket. Place your flap upside down and position so the line between the two sides just touches the chalk line and the excess fabric is hanging down toward the main pocket (You did remember to pull the lining out of the way, didn't you?). Baste in place. There's just too much fabric here for pins to work well—trust me. Now stitch the flap to the jacket just below that joint line, doubling back at both ends for strength and to lock it in place.
Pull out your basting stitches, flip down your flap (love that line), and press again. While you're at the iron, you may want to take those 1/4 inch folded over edges and pinch them in toward the center of the pocket a bit and press them in place as well. Finally run a line of stitches in the ditch just below your welt, double back at both ends, and trim your excess fabric below the flap. A bit of fray-check to neaten things up and you're done. If the bit of fabric below the final stitch line shows, you can always add a few blind stitches on each end of the pocket top.
I chose to add a center button on the ticket pocket, as well as the main pockets, just to finish things off.
I know—more pictures and less text, but I only decided to make this a DYI half way through the project.
Good luck on your next project.
Last edited by MNlad; 14th January 13 at 04:47 PM.
" Anything worth doing is worth doing slowly." - Mae West -
-
 Posting Permissions
- You may not post new threads
- You may not post replies
- You may not post attachments
- You may not edit your posts
-
Forum Rules
|
|


Bookmarks