X Marks the Scot - An on-line community of kilt wearers.
|
-
27th April 14, 09:27 AM
#1
Pleat stitching for lefties - here's a method that works
Hi all,
The instructions for stitching pleats in The Art of Kiltmaking are written for "righties". Many people have asked me what someone who is left-handed should do. I haven't had a very satisfactory answer in the past, because I am not left-handed myself, although I know that people have worked out a variety of strategies. But! I now have a suggestion that I _know_ works because I've just tried it out and pleated half a kilt this way.
Here's the problem. If you are right handed, you can stitch from the bottom of the fell to the top of the kilt along the edge of the pleat, and simultaneously put tension on the pleat to keep it nice and straight by clamping the tartan under your right leg ("the position" http://www.xmarksthescot.com/forum/f...osition-70750/) and pulling the top of the kilt to the left with your left hand. If you're left handed, however, you need to start at the top of the kilt and stitch a pleat toward the bottom of the fell. You still need to put tension on the pleat to keep it straight, but, since you're working right at the top of the kilt, there's no extra fabric to stuff under your leg to pull against with your right hand while you stitch from the top to the bottom of the fell with your left.
So - here's what I tried that works. I am in the process of pleating a Reverse Kingussie kilt where half the pleats have a different "handedness" than the other half. So I was faced with exactly the same issue for half the pleats that a leftie faces with a trad knife-pleated kilt - I had to stitch the pleats from the top of the kilt to the bottom of the fell. I had Dave take some pics of me sewing, but, since I'm still a rightie, I flipped them in PhotoShop so that it looks like a leftie stitching a regular pleat.
Step 1: Put on a pair of heavy pants that you don't mind putting pinholes into. Jeans are fine, but even heavier pants are better. In the pics below, I'm wearing my fav Kuhl Ryders (these are fab pants for all kinds of other reasons as well!).
Step 2: Pin the pleat along the full length at the right width. I use 6 or 7 pins. Start stitching at the top of the pleat, and stitch about 1/2" down along the fell.
Step 3: Pin the top of the kilt to your pants. I found that I needed to pin both the pleat that I was stitching and the one I was stitching into in order to be able to pull evenly on the pleats without skewing. Take a big bite with the pins so that you've got a sturdy hold.

Step 4: Pull with your right hand to straighten everything and make sure that your pins will hold in your pants.
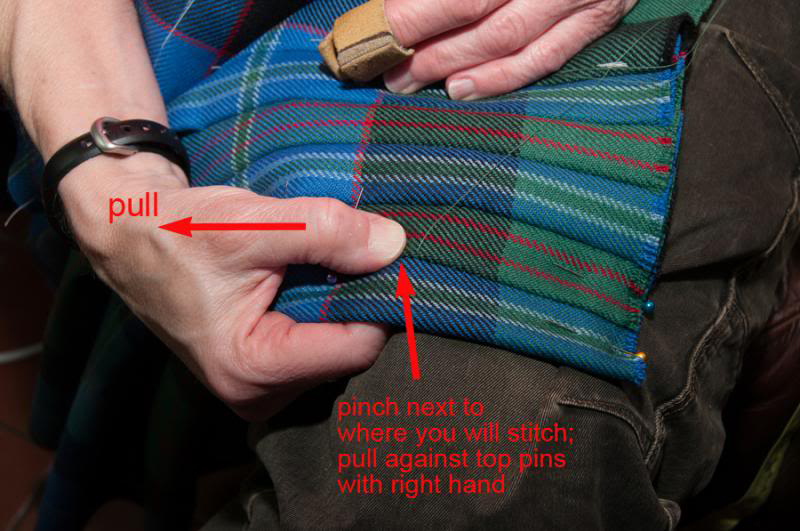
Step 5: Pinch with your right thumb next to where you will be stitching, and pull to your right.
Step 6: Stitch along the edge of the pleat as instructed in TAoK, but use your left hand and work toward the bottom of the fell along the edge. Keep tension on the pleat with your right hand.

I imagine that any clamping system would work just as well. This one is nice and portable!
Last edited by Barb T; 29th June 17 at 12:44 PM.
-
The Following User Says 'Aye' to Barb T For This Useful Post:
 Posting Permissions
- You may not post new threads
- You may not post replies
- You may not post attachments
- You may not edit your posts
-
Forum Rules
|
|


Bookmarks