|
-
6th January 12, 01:38 AM
#1
Less wrinkly not cadadh WIP
Briefly, I started out kilted reserving my claret hose for evening wear. I have reached a juncture where I need to bring my claret hose into daywear rotation because they are so darn versatile with the rest of my wardrobe.
So I went looking at diced hose. Then I looked at argyle hose, and for that kind of money I went on up the food chain and looked at knit "tartan hose" too. For the priced those things are going for, I am just not impressed.
I remember last spring there was a special closeout deal on tartan hose in my clan colors, not just generic tartan hose but actual Clan Scott tartan hose, way north of US$200, probably over US$300 with shipping, just no. They were the right colors, but they didn't otherwise look much like a Clan Scott sett at all. They looked like Argylles with extra stripes.
Even US$150 for a pair of socks that doesn't come rated to -60dF, I just can't justify it.
So I read up on cadadh, the old school tartan bag socks. Too puffy in the ankles. I could see making them lay flatter if I had a pair of ghillie brogues on my shopping list, but I don't have those on my shopping list. I haven't worn lace up shoes with black tie since, well, the dude in the White House that year is dead now.
So I ruminated on it, and then I made a prototype cadadh with a less wrinkly ankle.

-
-
6th January 12, 01:39 AM
#2
Re: Less wrinkly not cadadh WIP
So the protoype proved the idea to my satisfaction. All these are is regular bag socks. Except for a couple nuances.
1: I want these to fit like a tailored garment, not some primitive survival mode solution.
xxxxxa: because these are woven, not knit, left and right are not interchangeable.
xxxxxb: they have to be on the bias, not near the bias, on the bias.
xxxxxc: they have to look like I spent a LOT of money to get them.
xxxxxd: budget is US$50.
2: these are not regular bag socks
xxxxxa: I took a bunch of slack out of the ankles
xxxxxb: (sorry re-enactors) I used an industrial solution to do it.
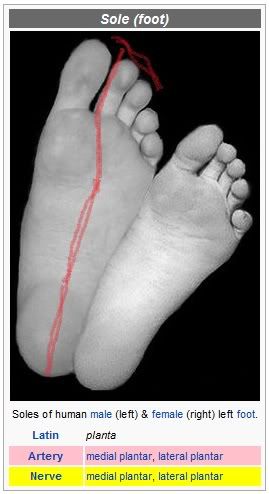
First up is planning. Where do you want the seam in your shoe to lie? I chose this line for simplicity of pattern and foot comfort. I figured running the seam straight up the middle would suck equally under both feet. Moving the seam out to either side would bunch a glob of cloth up in between the fronts of my toes and the shoe leather. Background image from wikipedia.
Second, if you want these on the bias, iron a straight crease into your pattern piece before you lay it on your leg. You got to cut the pattern piece on the bias so it will lay like the real thing. I wear a size US10 shoe, from floor to bottom of kneecap I measure 18 inches. My cut out ready to duplicate pattern is nominally 16x28 inches. Start with something like 20x30 inches if your measurements are close to mine.
I made the first prototype pattern from a cut open pillow case. Mistake. They iron a serious crease into those things as they are folding them over to sew the other two sides. I could not iron that crease out and was fighting it the whole way. For my second pattern I bought an inexpensive twin size flat sheet and cut a chunk out of it, much better.
Once you have a big enough piece of bias cut woven something to make you pattern from, and you ironed a crease down the middle of it so the pattern on the product lays correctly, here are the instructions for making the pattern:
Pin it together around your leg where you want it. Leave enough room in the ankle area to get the heel of your foot in and out.
NB: I suggest using safety pins so you can get up and walk around in the pattern. If it is comfortable to walk in (foxtrot anyone?) on the safety pins, probably the seam line is in a good spot for you.
There is a lot of gather, pin, move a few inches, gather, pin, etc. And then go back take a pin out, re-gather, re-pin, etc. Effort here is going to pay off later. Just keep moving pins around until the seam under your foot lays where you want it, and the crease you ironed in lies naturally vertical, right straight up your shin bone.
When you are happy, no, when you are ecstatic, take it off. Cut off the excess cloth. When you cut leave a half an inch of extra cloth between the pins and the scissors. When you sew it up later, you will put the needle and thread half an inch inside the cut edge.
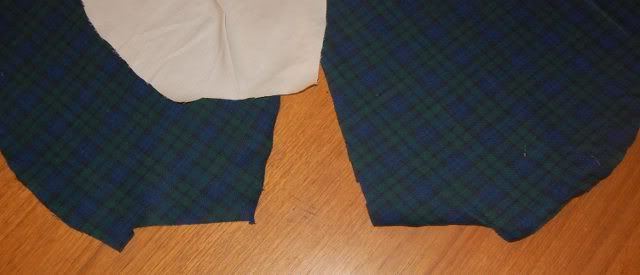
What I did was make the pattern on my right leg. I wear the same size shoe on each foot, but my right foot is a tiny bit bigger. After the pattern was ready, I cut one fabric piece with the pattern right side up for my right leg, and another piece with the pattern upside down for my left leg. These are the toes ends of my pieces and pattern:
Last edited by AKScott; 6th January 12 at 03:07 AM.
-
-
6th January 12, 01:40 AM
#3
Re: Less wrinkly not cadadh WIP
Now I am ready to sew. First, close the foot:
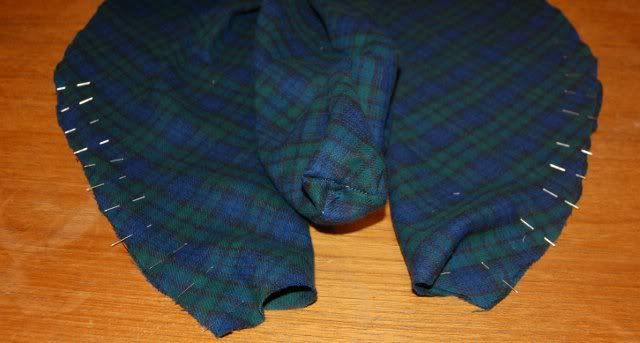
These are my two beta units pinned up for the sewing machine, with the toe end seam on my prototype visible in the middle.
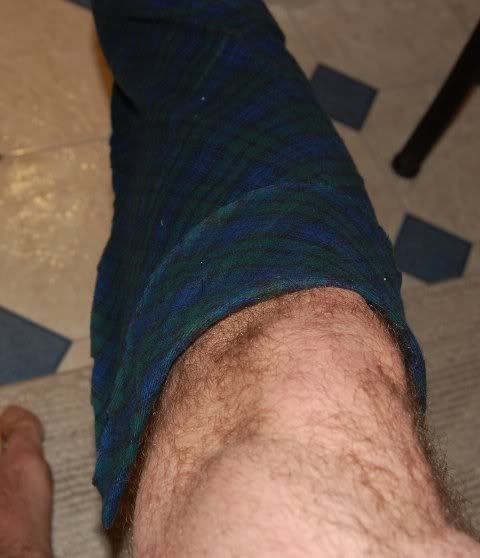
With the foot end closed, next up is to set the height of the hem at the top. For this part make sure you have the left sock on the left foot and right sock on the right foot, but inside out. Also be sure the cloth on the front of your leg is touching your skin from the toe all the way up your foot and over your ankle and all the way up your shin. If you pull it to tight it will lift out of that corner and never look right later. You might be rudely suprised to find your knee caps are different heights off the floor. Just saying, you are not a machine, you are an organism. I have had fine results using four pins on each side at this stage.
Next, iron that pinned in crease down. This will eventually be the visible top edge of the garment. Next fold it open, trim back the scrap as needed and fold the scrap into two, leaving enough space to fold both layers of that back over the crease you already ironed in.
When you are ready to fold it back shut to sew it down, it should look about like this. Once folded closed, the top of the sock will be three layers thick, but the cut/fraying edge at the "end" of the cloth will be trapped inside the hem by the other two layers. I will replace this picture with the same image edited in MSPaint using circles and arrows. I can see what I am talking about, and I am sure experienced tailors can too, but it isn't clearly illustrated.
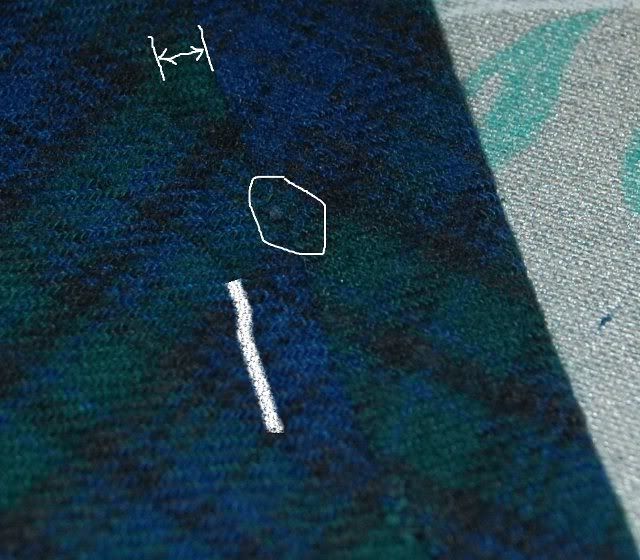
NB: the thick white line above lies on the crease ironed into the fabric where the top of the hose was pinned up on my leg a few minutes prior. Then I unfolded it and ironed in a second crease (far right edge, that will be the bottom of the hem inside the sock. The white circle shows a bit of the cut edge of the cloth. The white distance marker shows a gap between the cut edge and defind pressed in hem. I left a bit of space there so when I fold it back shut everythign can lay flat.
Once the top hem is put to bed, pin it down and sew it shut.
next up is to pin up and sew down from the hem at the top to the point where your heel will just barely fit through:
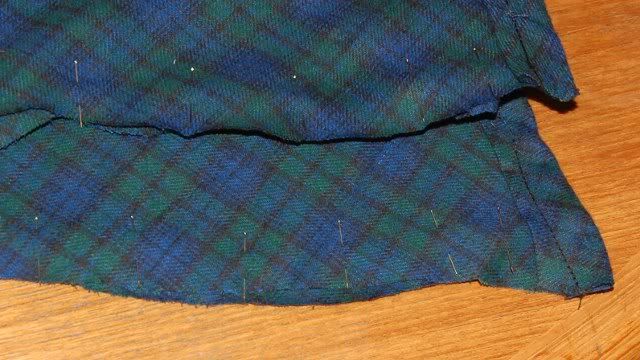
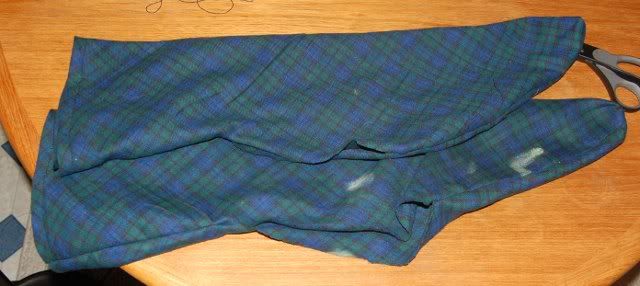
Once that is done, you should be to about here with the socks finally turned right side out. I chalked an L on the sole of the foot of the left one so I coudl tell them apart:
Last edited by AKScott; 6th January 12 at 08:08 PM.
-
-
6th January 12, 01:40 AM
#4
Re: Less wrinkly not cadadh WIP
reserved for snap installation
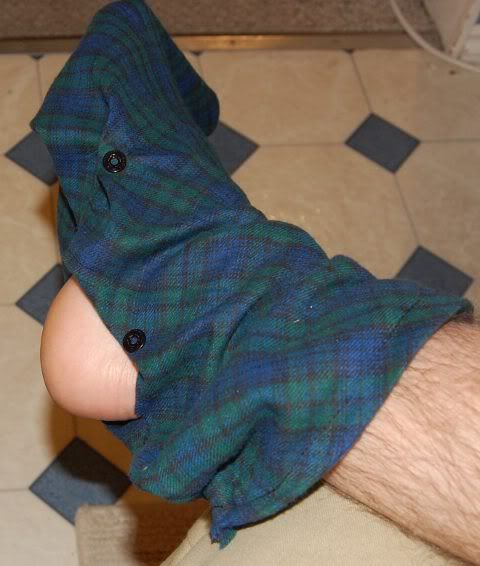
I need an assistant with opposable thumbs to carry on from here. My wife and daughter should be home tomorrow. The short version is I am going to wrap the open bits rather firmly around my ankles and then install snaps in the cloth so I can close the socks firmly , but undo the snaps to put the socks on or take them off.
What I can't do with only two hands is hold the cloth where I want it to lay and mark for the snaps at the same time. I got close enough on the prototype, but I am not posting any pictures of the back view of the prototype either ;-)
This is the basic idea, from prototype construction:
Last edited by AKScott; 6th January 12 at 03:05 AM.
-
-
6th January 12, 10:04 AM
#5
Re: Less wrinkly not cadadh WIP
Great writeup, Scott!!
I'm looking forward to doing the same.
-
-
6th January 12, 01:54 PM
#6
Re: Less wrinkly not cadadh WIP
Way cool.
Have you thought about using KNIT fabric? I just checked and there are some interesting things available on eBay under Plaid Knit in fabrics. I do not see any BW tartan, but I see a lot of things worth investigating at $5-$10/yd. Also, having a sewing machine with a serger is probably going to help a lot...
Some take the high road and some take the low road. Who's in the gutter? MacLowlife
-
-
6th January 12, 02:15 PM
#7
Re: Less wrinkly not cadadh WIP
Are you using any type of iron work on these?
As it looks to me with som creative stretching and shrinking you could get a tighter fit
-
-
6th January 12, 06:44 PM
#8
Re: Less wrinkly not cadadh WIP
 Originally Posted by MacLowlife

Way cool.
Have you thought about using KNIT fabric? I just checked and there are some interesting things available on eBay under Plaid Knit in fabrics. I do not see any BW tartan, but I see a lot of things worth investigating at $5-$10/yd. Also, having a sewing machine with a serger is probably going to help a lot...
Now see what happens when you suggest I look in ebay...
http://www.ebay.com/itm/Linen-green-...item1c1d57c55c
Anyone need some maclean hunting hose... ?? Or a vest... Or a fly plaid... Or a drummers/pipers plaid... Or a kilt (no idea of weight or sett size)?
Last edited by madmacs; 6th January 12 at 06:52 PM.
-
-
6th January 12, 07:03 PM
#9
Re: Less wrinkly not cadadh WIP
Aside from enjoying the write-up, I really learned some stuff just reading here.
I have only just begun to learn how to use my sewing machine, but who knows!
Jim Killman
Writer, Philosopher, Teacher of English and Math, Soldier of Fortune, Bon Vivant, Heart Transplant Recipient, Knight of St. Andrew (among other knighthoods)
Freedom is not free, but the US Marine Corps will pay most of your share.
-
-
6th January 12, 08:25 PM
#10
Re: Less wrinkly not cadadh WIP
 Originally Posted by MacLowlife

Way cool. Have you thought about using KNIT fabric?
Thanks, and no I hadn't been looking at knits. I have my eye on making a pair of these in one of my actual clan setts from an actual Scottish mill someday maybe, so I was specifically looking for weaves from the get-go. I am using thread dyed shirting flannel from my local Jo-Anns Fabric store at I think $8 per yard.
If I have the patience I might also make a pair of garter ties from the same cloth, then when I unravel the ends I'll have a pair of garter ties that would work with solid hose under my Stillwater in Black Watch.
 Originally Posted by Emmet

Are you using any type of iron work on these?
As it looks to me with some creative stretching and shrinking you could get a tighter fit
I am only using an iron to set the creases for the hem at the top. It is the picture I just edited a few minutes ago with the white marks on it from MSPaint.
I am not too terribly concerned about getting the fit much tighter because the woven cloth I am using isn't very stretchy. If I was a statue, sure, we could paint them on. That is about as tight as I can go on me and still walk around in them.
I cogitated on that a bit before I started and realized having the underside of the thing reach around my heel requires - when constrained to woven fabrics - that there be some excess bunched up in the inside corner where the front of the ankle meets the top of the foot.
The only way I know of to make that excess cloth go away and still be able to move my foot around is to use a knit.
-
Similar Threads
-
By Alan H in forum Show us your pics
Replies: 11
Last Post: 19th December 09, 07:34 AM
-
By Rick in forum How to Accessorize your Kilt
Replies: 32
Last Post: 18th March 09, 08:34 PM
-
By orangehaggis in forum How to Accessorize your Kilt
Replies: 6
Last Post: 9th March 09, 03:31 PM
Tags for this Thread
 Posting Permissions
- You may not post new threads
- You may not post replies
- You may not post attachments
- You may not edit your posts
-
Forum Rules
|
|


Bookmarks