|
-
11th November 24, 12:51 PM
#11
Pockets
My wife and I made the style pockets the Macdonald video shows. I put it on the inside of the inner apron, about 1/4 of the way from the right side. I keep a minimalist style wallet in that pocket. Simply put my index finger between the shirt and inner apron and lift the pocket straight up.
A lot less difficult than getting your wallet out of the sporran, and the pocket does not show.
Just my experience.
-
The Following 2 Users say 'Aye' to Kitfoxdave For This Useful Post:
-
12th November 24, 10:12 AM
#12
 Originally Posted by Kitfoxdave

My wife and I made the style pockets the Macdonald video shows. I put it on the inside of the inner apron, about 1/4 of the way from the right side. I keep a minimalist style wallet in that pocket. Simply put my index finger between the shirt and inner apron and lift the pocket straight up.
A lot less difficult than getting your wallet out of the sporran, and the pocket does not show.
Just my experience.
That certainly gives me something to think about. Thank you for sharing.
-
-
12th November 24, 12:26 PM
#13
There is a large pleat at the edge of both the aprons on my kilts.
I thought that there would be on most kilts - I got hold of kilt making instructions many years ago now and although it was for a standard kilt, there were double sized pleats at the edge of both aprons, on one side it was an extended pleat and on the other I think an inverted box pleat. I can't remember now if there was a gap between the edges of the folds or not. It could have been either >< or > < or it might have been the first at the waist and the second at hip level.
The centre back pleat of the reverse Kingussie style seemed logical as I used to ride a bike back then. It is a >< inverted box pleat. I matched the pattern - the join in the fabric was not always in the centre of the pleat - rather than lose any fabric I just joined up what I had and created a box pleat with equal folds.
Making the pocket from soft material might not actually disguise it. I'd be more inclined to use something which would not deform to show the outline of the contents, on the outside of the pocket, certainly, and to make a pocket bag with an expansion strip - it might be called a gusset, around it.
On the right hand side you could fix the pocket within the deep pleat or have a pocket hanging between the aprons - or both - as long as the under apron was wide enough to allow for safe access to it. I was thinking of a situation where you might want to have documents, tickets, booking forms - a significant amount of money, really secure, when you needed to have them really secure but also accessible.
Anne the Pleater
I presume to dictate to no man what he shall eat or drink or wherewithal he shall be clothed."
-- The Hon. Stuart Ruaidri Erskine, The Kilt & How to Wear It, 1901.
-
The Following 2 Users say 'Aye' to Pleater For This Useful Post:
-
12th November 24, 01:54 PM
#14
The way I did my Under-Apron pocket was a bit different.
Angled towards the apron overlap.
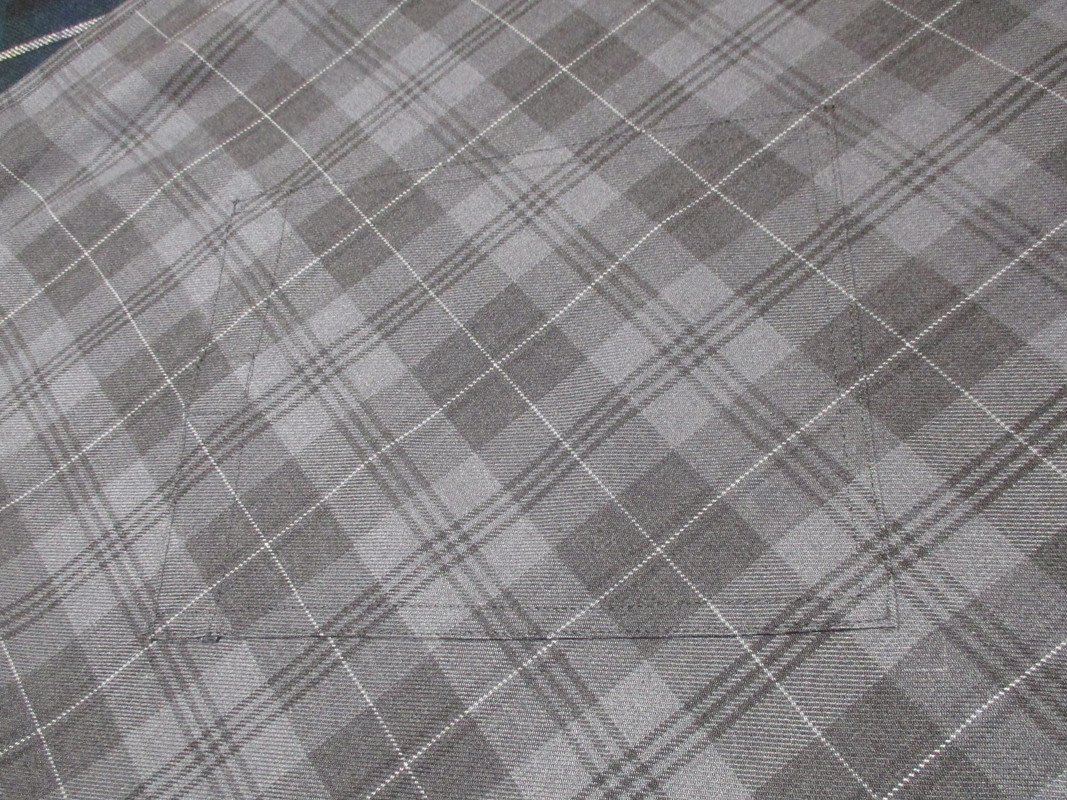
And a detail shot.
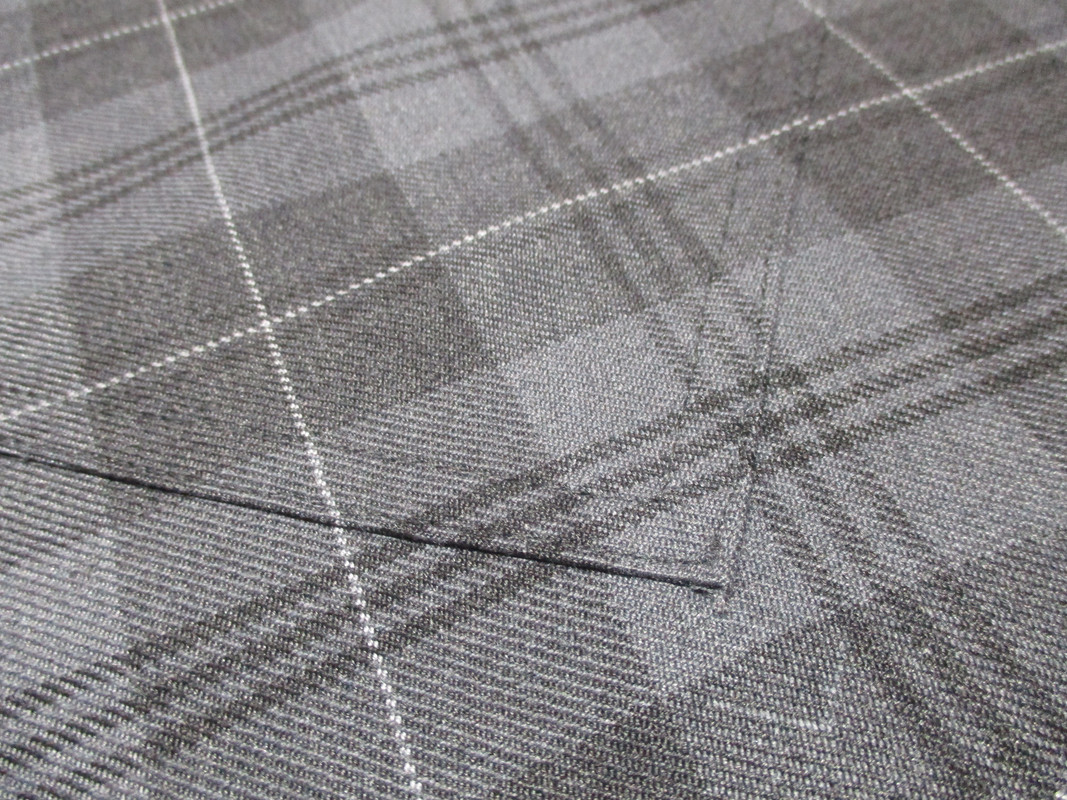
I was real particular about my Side Slash Pockets. I did everything I could so that they would lay flat even filled. That all the stress points were good and strong. And that if you did not know they were there you would not notice them.
The concept is that you make the Deep and Reverse pleats really deep. Sew in reinforcement to ensure keys and sharp things did not poke through.
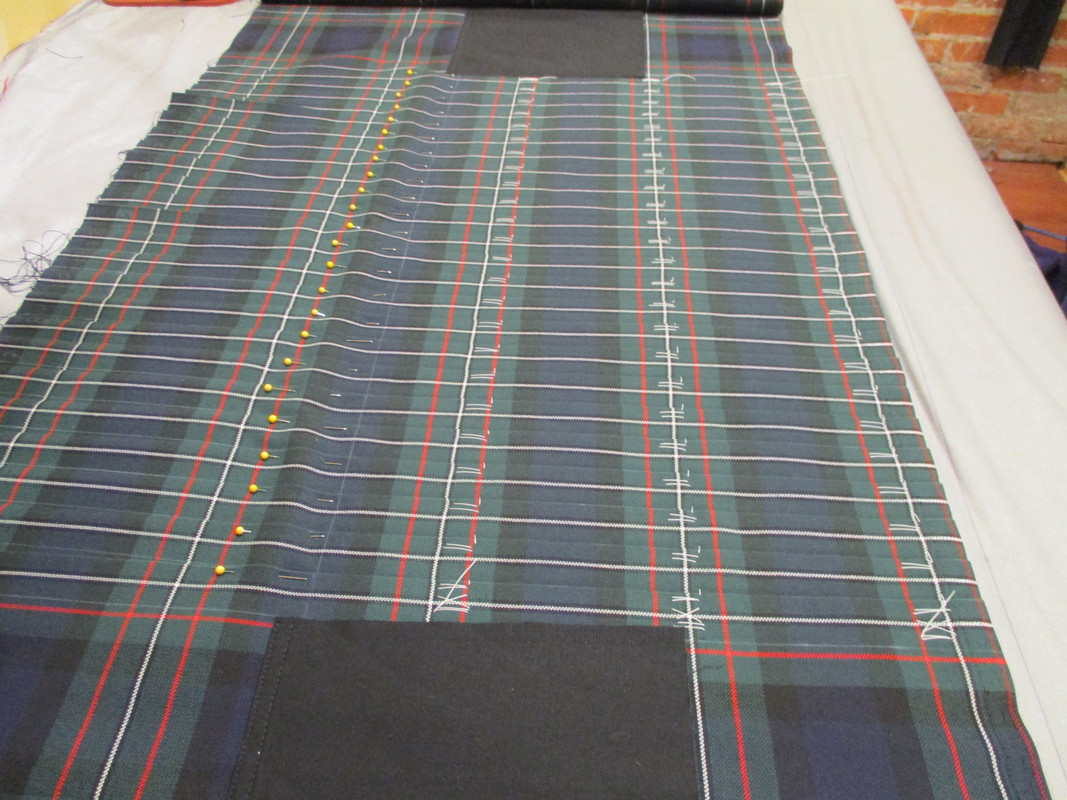
Add reinforcement to the pocket opening.
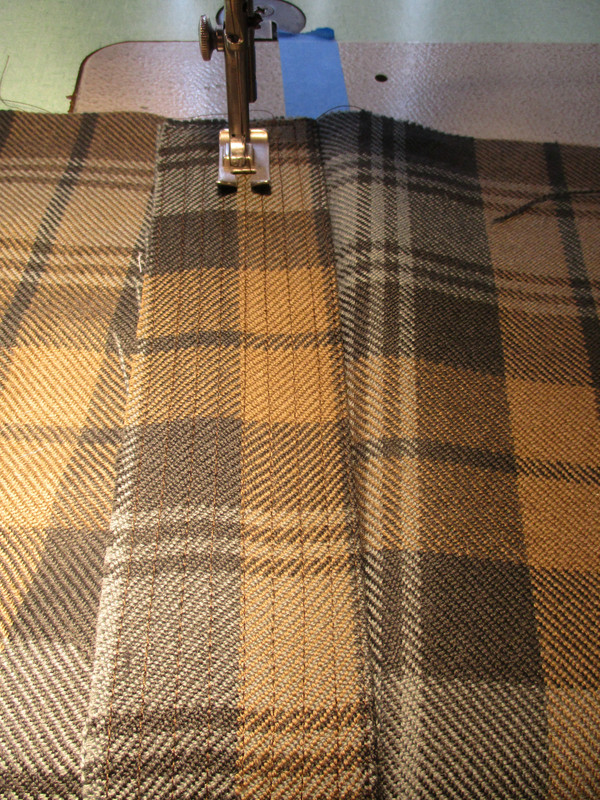
Fold the Deep Pleat closed and sew in the shape of the pocket.
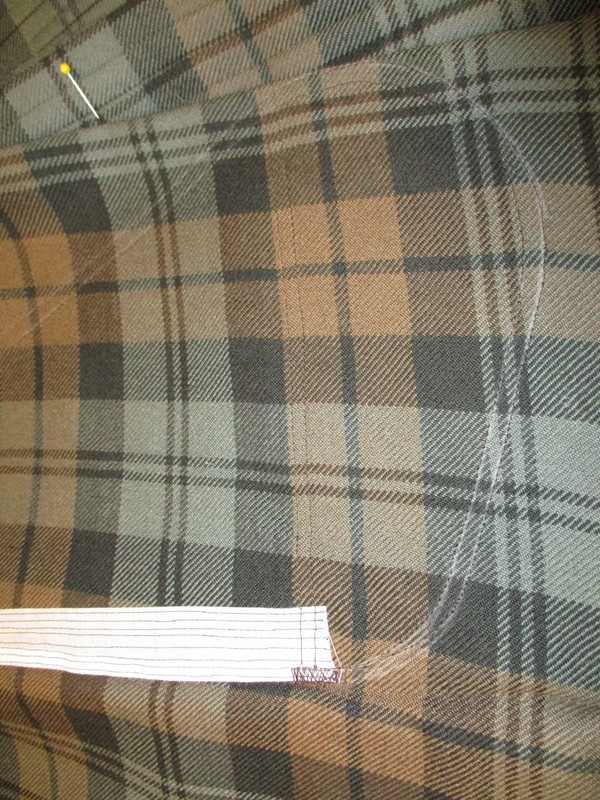
Fold the pocket closed and add bar tacks to reinforce top and bottom.
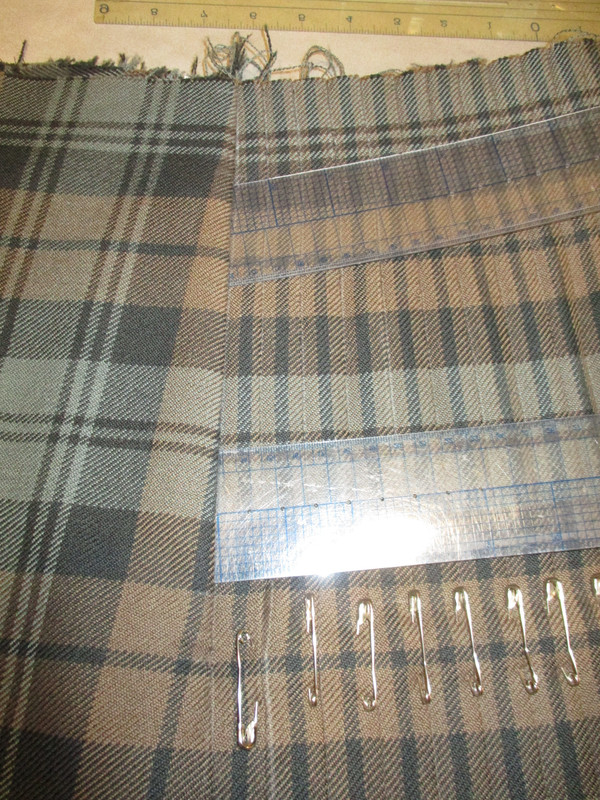
Trim everything up and you are done.
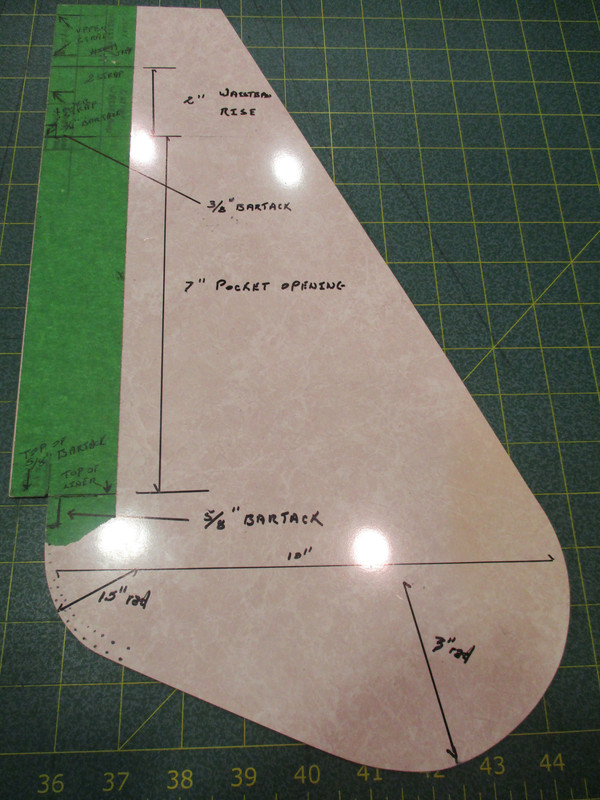
Here is the pattern for the pocket.
]
-
The Following 4 Users say 'Aye' to Steve Ashton For This Useful Post:
-
16th November 24, 10:58 AM
#15
Thank you!
Thanks so much for sharing the pocket method you developed!!!
-
-
 Originally Posted by Pleater

There is a large pleat at the edge of both the aprons on my kilts.
I thought that there would be on most kilts - I got hold of kilt making instructions many years ago now and although it was for a standard kilt, there were double sized pleats at the edge of both aprons, on one side it was an extended pleat and on the other I think an inverted box pleat. I can't remember now if there was a gap between the edges of the folds or not. It could have been either >< or > < or it might have been the first at the waist and the second at hip level.
...
My USA Kilts casual kilt only has a deep pleat on the left side. The right side has standard depth knife pleats right up to the under apron.
But, their casual kilt is designed to make kilts more accessible by reducing cost. So, I suppose it's not surprising they'd eliminate a deep pleat where it's not strictly necessary.
Ending the row of knife pleats with a reverse box pleat, with one side elongated into a deep pleat, seems like it would work perfectly.
I had to sit down with a length of tartan and pleat it to visualize what was going on.
It's kind of like a single deep knife pleat going the opposite direction from the others.
I'm probably putting the cart before the horse by worrying about pockets before I've learned kilt design. But, I like to have a vision of where I'm trying to go before I set off, so I can chart a proper course.
Thank you for the added detail about the spacing of the pleat. What you described makes sense, and will probably stop me from fretting when I get to that point.
 Originally Posted by Pleater

...
The centre back pleat of the reverse Kingussie style seemed logical as I used to ride a bike back then. It is a >< inverted box pleat. I matched the pattern - the join in the fabric was not always in the centre of the pleat - rather than lose any fabric I just joined up what I had and created a box pleat with equal folds.
...
Even in my home, I'm surprised how often I graze something on my right side, and the knife pleats grab it.
The symmetry of reverse Kingussie also appeals to me.
But, I worry about the reverse box pleat being off center.
If the box pleat is perfectly centered when the straps are in the center hole, and the straps have a typical 3.5 inch range, then that's 1.75 inches each direction the straps can move. The outer apron remains centered, so the pleats move half the distance of the width change.
Therefore, the box pleat would be 0.875 inches (2.22 cm) off-center when the straps are worn in either the tightest or the loosest hole.
Hmm...
In my head, that sounds simultaneously like a very small, and a very large amount.
 Originally Posted by Pleater

...
Making the pocket from soft material might not actually disguise it. I'd be more inclined to use something which would not deform to show the outline of the contents, on the outside of the pocket, certainly, and to make a pocket bag with an expansion strip - it might be called a gusset, around it.
On the right hand side you could fix the pocket within the deep pleat or have a pocket hanging between the aprons - or both - as long as the under apron was wide enough to allow for safe access to it. I was thinking of a situation where you might want to have documents, tickets, booking forms - a significant amount of money, really secure, when you needed to have them really secure but also accessible.
Anne the Pleater
Hmm, good points. I need to think about that.
Thank you so much for taking the time to share your thoughts with me!
-
-
Thank you for providing this! I apologize for how long it took me to respond. Life was hectic last week.
If I'm seeing correctly, your under-apron pocket is at about a 45 degree angle, affixed to the outside of the under-apron.
It has a small square of Velcro(?) to hold it closed, and is roughly the size of a jeans pocket. Certainly large enough to hold a cellphone.
Simple enough, although I may have missed something.
More importantly, I'm trying to understand the slash pocket construction, but I'm not quite grasping it.
I've been mulling it over all week, and here's what I think I'm seeing:
In the picture with the black fabric, that fabric forms the lining of the pocket. In the picture, the black fabric is sewn along its left side (the top side of the kilt), connecting it to the deep pleat. At that step, the black fabric isn't sewn anywhere else. The black fabric is then flipped over toward the top of the kilt. When flipping it over, leave about 4" of black fabric at the bottom overlapping itself.
Then, the pleat is folded over, which also folds the black fabric in half width-wise, creating both sides of the pocket lining.
Now, the pocket shape is sewn, and the excess black fabric is trimmed off.
If that's correct, then I wonder:
1. What's the point in overlapping the black fabric only on the bottom ~4" of the pocket? Is it to strengthen the lower pocket by adding an extra layer of fabric? Or is something else going on that I'm missing?
If I'm visualizing it correctly, it also moves the stitches a layer away from the inside pocket lining, so nothing in the pocket will catch on them. But then again, if the overlap wasn't there, those stitches also wouldn't be there.
2. Both sides of the deep pleat are sewn together where the pocket is formed. The pocket outline stitching goes through one layer of the deep pleat, through both the front and back sides of the pocket lining, and through the other layer of the deep pleat, bringing it all together. I just want to make sure I understand that correctly.
3. The pocket has a very tall opening (7"), but the space cradled inside the pocket is long (10") and shallow (~4"). Anything taller than that would reach above the bottom of the pocket opening. Although, that's not necessarily a problem, because the pocket opening is on the side. As long as the 4" bottom is deep enough to keep items securely in place, sticking up doesn't cause an issue.
4. The top of the pocket opening is actually tilted to stick out more than the bottom of the pocket opening. When I picture putting my hands into a pocket, this seems backward. So either I'm misunderstanding, or there's a good reason this is done that I don't realize. Maybe that hides the pocket opening better? Does it encourage the pocket opening to remain shut as opposed to splaying open?
5. I see the pocket opening is reinforced with tartan on one side, and white fabric (interfacing?) on the other. But I'm unsure how these details are sewn. I think two pieces of tartan and two pieces of white fabric are used per pocket. The two pieces of tartan line each side of the pocket that the hands will touch when going into the pocket. And the two pieces of white fabric go on the opposite sides of the pleat. So the eight rows of stitching go through one piece of tartan reinforcement, through one side of the pocket, through the pleat, and finally through the white fabric. Repeat for the other side of the pocket.
Thank you so much. I apologize for my lack of understanding. But I'm trying!
-
-
The white fusable interfacing was an early version and did not work. It caused a hard spot that wore right through the wool fabric. I now use only on layer of tartan folded in half for the pocket opening edge.
Yes, the pocket lining is only the bottom portion of the pocket. Basically from the bottom of the opening to the bottom of the pocket. It is to re-enforce the wool fabric which is prone to keys poking right through.
You can see where the lining is sewn in this photo. It is just below the wide black stripe.

The pocket opening is to the bottom in the above photo.
-
 Posting Permissions
- You may not post new threads
- You may not post replies
- You may not post attachments
- You may not edit your posts
-
Forum Rules
|
|


 Reply With Quote


Bookmarks