|
-
7th February 06, 05:53 PM
#1
Handle Installation: Part II
Clean up the slots and check for a good fit. Ideally the tang will be a little loose. This insures room for the glue and allows the slabs to fit together tightly. If it's too tight, work out some material with a file or paper...don't try to re-drill it.
If you haven't already done so, polish the side of the bolster that will show with steel wool. Use a nail or other sharp point to score the side of the bolster that fits against the handle wood so that the glue will grab better.
Prep the blade and bolster by scrubbing it well with hot soapy water, drying, and wiping down with alcohol.
Prepare a good quantity of two-part epoxy glue. Apply glue to the blade notches and press the bolster into place. Now pack the handle slots with glue. Cover the flats of the slabs, and the underside of the bolster, with a thin coat of epoxy as well. Assemble the knife, making sure that all of your dot marks are in the right place. Apply two rubber bands to compress the slabs. Using a vise or clamps seems to encourage the slabs to slip out of place.
This photo shows the assembled knife dry fit (no glue yet). Note that all four dots are visible and that the seams are really tight.

After you get the glue and rubber bands in place, place a paper towel or newspaper on your work bench. Stand the knife point up and press firmly down on the blade. This seats the bolster and ensures that the two slabs are in perfect alignment. Glue will be oozing out of all the seams. Let it ooze. All this will be ground off later, anyway. Walk away and let the epoxy set.
After the glue has cured (give it plenty of time!) you'll need to remove the excess material. I don't have a sanding station, so I clamped my belt sander to the work bench. If you do this be sure that the belt is turning towards the floor. This same job can be done with files and paper, but the sander moves material much faster. Note that even thought the blade is not sharpened I'm using a leather glove on the blade hand. Not visible, but essential, is hearing protection, safety glasses, and a respirator.

Grind down the wood to the profile you desire. The bolster aluminum will grind down just like the wood, making a seamless transition.
The down side of a belt sander is that it is just too wide and flat to create curves in the handle. Hand filing or using a narrow grinding belt can accomplish this. My finished handle looked a bit too much like a kitchen knife, so I added an engraving (that matched my wedding ring!) to the handle with a dremel tool. Not art, but acceptable. Watco Danish Oil finish was applied to the walnut for long-lasting protection.
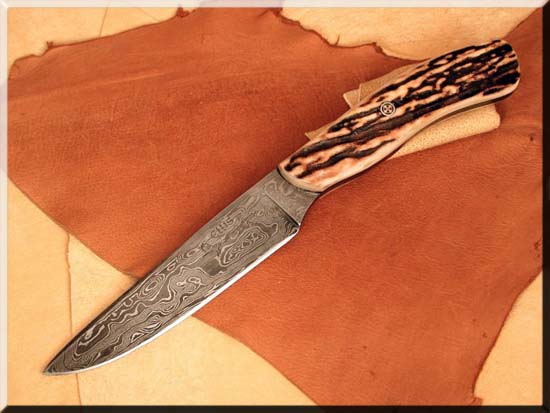
So here it is..my first knife.

Cheers,
Bill
Last edited by Tartan Hiker; 11th December 06 at 09:50 PM.
-
-
7th February 06, 06:48 PM
#2
Very Nice! Great Project. Thanks for Documenting it so well.
-
-
7th February 06, 06:56 PM
#3
Absolutely outstanding Tartan Hiker! I did not think that I would ever want or need to make my own sghian dhub, but this has got me very interested and I own almost all the tools except the specialty sand papers.
Although given the price of a sghian dhub on Track of the Wolves site...but I really do not like their handle.
Last edited by KiltedCodeWarrior; 7th February 06 at 07:01 PM.
The kilt concealed a blaster strapped to his thigh. Lazarus Long
-
-
7th February 06, 07:04 PM
#4
Silicon carbide is available at any hardware store, and is not much more expensive than regular paper. For a bit extra you can get the cloth-backed waterproof kind, and using it wet works better than using dry paper.
-
-
7th February 06, 11:34 PM
#5
That's freaking cool.
How do you get this finish though?
-
-
8th February 06, 04:47 AM
#6
The blade in the photo is made from Damascus steel (2 different steels folded together many times) but even then, you need to etch with acid to show up the pattern. Damascus can vary from quite expensive to very expensive.
Some of the blades I use and make.
Rab
 Originally Posted by minimalistix
That's freaking cool.
How do you get this finish though?
-
 Posting Permissions
- You may not post new threads
- You may not post replies
- You may not post attachments
- You may not edit your posts
-
Forum Rules
|
|


Bookmarks