|
-
20th September 06, 06:44 PM
#1
Let's seen the pics, Alan!
I've been thinking about making one for the last 6 months or so. My wife works in an upholstery shop so I can get all the brass upholstery nails I need. I have some brown upholstery leather I got left over from one of my dads jobs. Just trying to figure out how to make the 10" spike and do the transition from the center boss & make it removable.
-
-
20th September 06, 06:53 PM
#2
 Originally Posted by Livingston
Just trying to figure out how to make the 10" spike and do the transition from the center boss & make it removable.
A re-enactor, whom I trust, tells me that there is no historical basis for those spikes.
They look pretty cool in clan tents, though!
Virtus Ad Aethera Tendit
-
-
20th September 06, 08:54 PM
#3
Alan,
I have thought about that myself when I've seen the wood disks at Home Depot. Never had the gumption to actually try and make one though.
Good on You!
-See it there, a white plume
Over the battle - A diamond in the ash
Of the ultimate combustion-My panache
Edmond Rostand
-
-
21st September 06, 06:33 AM
#4
Thanks for the tips, I want to make a targe also to hang on the wall next to my cheap imitation claymore  I'll see if I can do as good a job as you! I'll see if I can do as good a job as you!
-
-
21st September 06, 06:50 AM
#5
-
-
21st September 06, 07:32 AM
#6
Yep, they're quite cheap and easy to make! I've made two....
Spring for a few more dollars for actual leather, however, and you'll have a finished product much closer to the real thing. You want a heavier leather such as cowhide for the front face, and thinner for the backside; deerskin is good. On my second targe I used unborn calfskin with the hair still on.
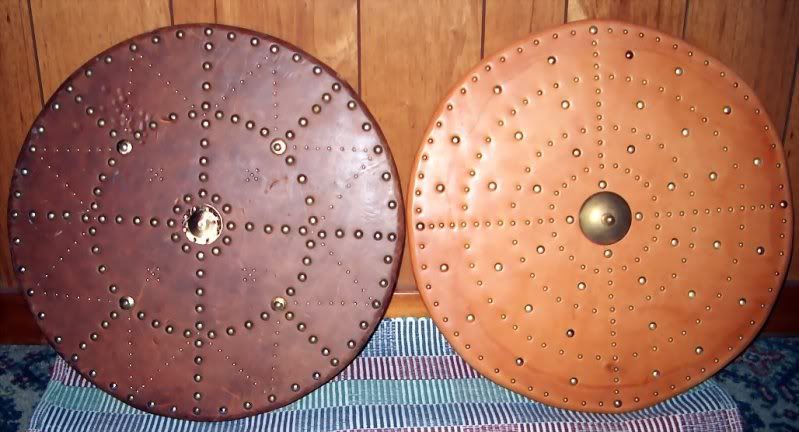
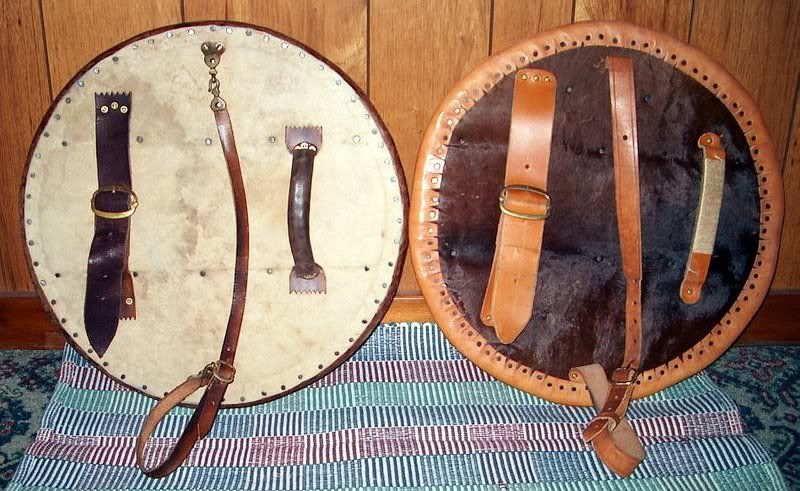
I made the armstraps adjustable with brass buckles, and added slings for carrying the targe on one's back when not in use. You can see two methods of construction: the front leather overlapping the back piece, or vice-verse....
Brian
"They who can give up essential liberty to obtain a little temporary safety, deserve neither liberty nor safety." ~ Benjamin Franklin
-
-
21st September 06, 08:46 AM
#7
Woodsheal, those are gorgeous! Whoooaaaahhhhh. It helps that you got the boss actually in the center of your shield
*groooaaannn*
How much did the leather cost you?
-
-
21st September 06, 10:12 AM
#8
Originally Posted by Bob C.
A re-enactor, whom I trust, tells me that there is no historical basis for those spikes.
They look pretty cool in clan tents, though!
Well there went the reason I had for putting it off  Guess I'll just have to make it next month. Way to much OT till the end of the US Governments fiscal year. Guess I'll just have to make it next month. Way to much OT till the end of the US Governments fiscal year.
Woodsheal, those are sharp. I think you gave me a new reason to put it off a little longer with the heavy leather for the front.
-
-
21st September 06, 11:06 AM
#9
alan where are the pics!!!!!!!!
hopefully Woodsheals didnt scare your targe........
J/K
-
-
21st September 06, 12:00 PM
#10
Gents,
Thanks for the kind words...!
I basically used the same methods Alan describes:
-For the front piece, a circle of leather 4 inches wider than the finished targe will be (so 23" for a 19" targe)
-The back piece an inch under targe diameter (18" for the 19" targe)
-Mark the exact center of your circle of wood, and drive in a finishing nail at that point.
-Mark the center of your leather front piece, and punch a small hole at that point.
-Glue the front piece of leather to the targe face, using the finishing nail thru the hole to center it. Remove the nail.
-Glue and nail (upholstery tacks) the rear piece of leather to the back of the targe. You can add padding under this piece if you desire, especially where your arm will be positioned when wearing the targe. I use a couple of layers of woolen fabric from scraps left over from sewing projects.
-Go around the edge of the leather front piece, cutting out 1" wedges, so it looks like a circular saw blade when you're done. This pattern allows the leather to be drawn around to the rear and nailed without bunching up.
-Thoroughly wet the "saw blade" teeth and the front-piece leather to the depth of a couple of inches to make it pliable.
-Laying the targe front face down, you'll now begin the process of pulling the leather around to the back and nailing it in place, again using upholstery nails.
-Begin at the 12 o'clock position, grabbing the top "saw blade" tooth, pulling it tightly over the rim of the targe to the rear, and nailing it in place (you'll be overlapping the rear leather piece). Go to the 6 o'clock "tooth" and do the same, then 3 o'clock, 9 o'clock, etc., pulling and nailing opposing "teeth" until you've nailed the entire circumference of the front piece over the rim and to the rear. Re-wet the leather as needed to keep it pliable.
-Now go around and cut off the tips of the leather "teeth" to give leave a smooth edge (see photo).
-Place the targe out in the sun to dry the leather, which as it dries will shrink tightly into place around the rim.
Decorate and add straps/grips as you desire. Not all targes had a large central boss. A large decorative brass nail is appropriate.

I have a friend who does re-enactment related leather work - belts, cartridge boxes, etc. He will pre-cut you the circular leather pieces in the proper weight and diameter for your targe project. PM me if interested in contact info....
Brian
"They who can give up essential liberty to obtain a little temporary safety, deserve neither liberty nor safety." ~ Benjamin Franklin
-
 Posting Permissions
- You may not post new threads
- You may not post replies
- You may not post attachments
- You may not edit your posts
-
Forum Rules
|
|


Bookmarks