|
-
Acid Etching ...as requested!
Brian asked on my last sgian post if I'd do a write-up on acid etching. I'm not sure I qualify as any kind of an expert, seeing that I have around a whole two weeks experience, but here's what I've figured out & the way I do it.
I've played with acids to colour steel before, but that was using carbon steel & a finish similar to gun bluing. Now that I'm mostly working with stainless at the moment, I decided to have a crack at replicating damascus steel without all the hassles of pattern welding. All the corporate metal finishers & the big guns of custom knife making state that the best way to etch stainless is with a mix of hydrochloric & nitric acids, diluted with distilled water. For some reason, I just couldn't get this to work. Whether it was the cheap imported blades I was practicing on, or simply lack of ability on my part is still unclear. I decided to have a try with Ferric Chloride rather than the acids. This is more properly a caustic rather than an acid, but it is potent stuff & burns & smells just like it's big brothers. It usually used for producing the tracks on printed circuit boards, but is also used successfully for etching the carbon steels. My theory was leave it on the stainless for a bit longer, & I couldn't be any worse off than I was with the acids.
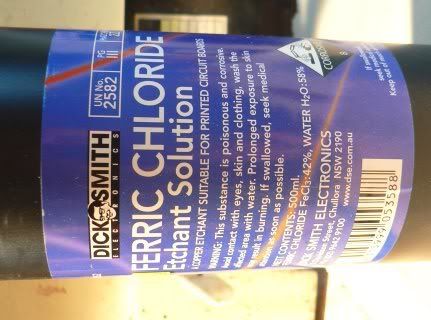
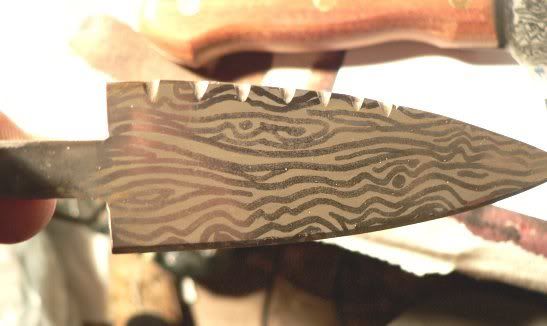
I whipped up a couple of rough blanks & proceeded to try & replicate the look of damascus steel. The first results were pretty ordinary pattern-wise, but the Ferric chloride surpassed my expectations.
I shot out & grabbed a big kitchen knife to try & improve the looks & it turned out much better,but still note quite what I was after.
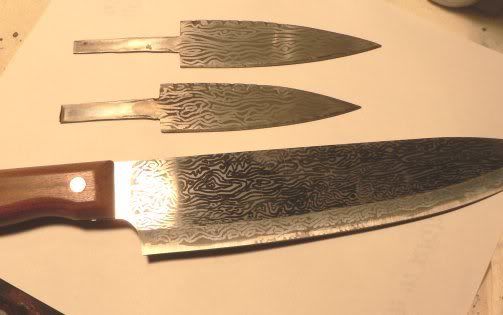
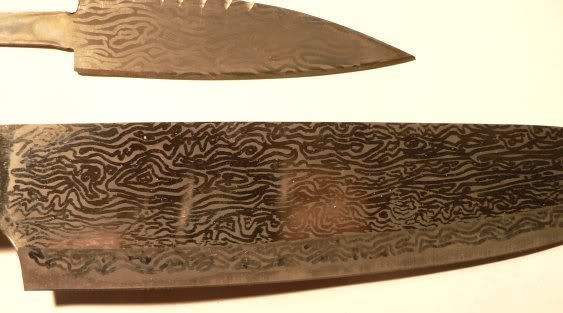
I have an idea now for getting the look much closer to the real deal, but that's a subject for another thread 
-
-
OK, now for the how-to: the knotwork didn't happen as the hilt is still a fair way from finished, but it seemed a perfect opportunity to etch the Mackenzie sgian I posted in an earlier thread.
The first step is to clean& degrease the blade thoroughly. I used white spirit for this.
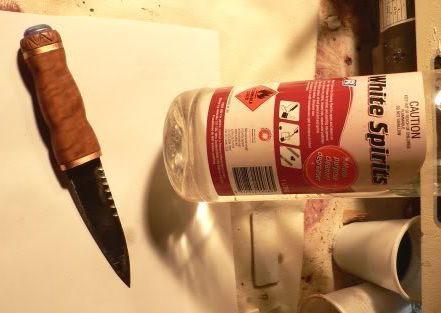
Next is to create the design on the blade using one of a number of different methods. For the "damascus" I use an acid resist pen only. These are used for drawing out circuit boards onto the copper, and are obtainable from radio shack or similar stores, along with the ferric chloride.
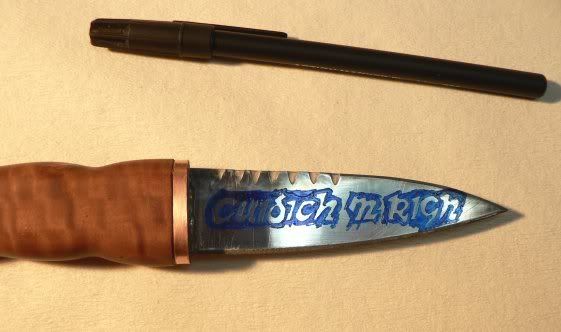
In this project I used candle wax as well, as I like to have a bit of a wall to contain the acids. If candle wax is used for a resist on it's own, the design has to be scribed through the wax with a scriber, or knife, etc. Observant kilt-makers will notice the startling similarity between my scriber & a thread unpicker. I found mine in my wife's sewing box, but it had a slight accident with a pair of snips & a file, & now it lives in my workshop  If I used wax alone, I'd personally melt it in a container, & apply it with a brush or cloth for ease of scribing. If I used wax alone, I'd personally melt it in a container, & apply it with a brush or cloth for ease of scribing. 
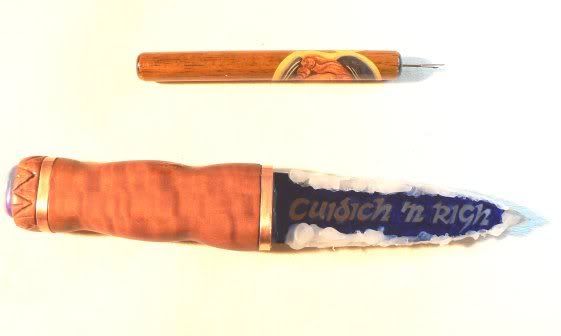
If I remember any of my lessons from the navy correctly, Shellac also makes a good resist, & can be easily brushed over the bigger areas
-
-
Here's the wax over the larger sections, & also serving as a kind of dam wall. Unless you are repeating the same pattern on both sides, I'd suggest repeating the wax over the edges on the reverse side, to stop any acid from leaking through & running down the underside.
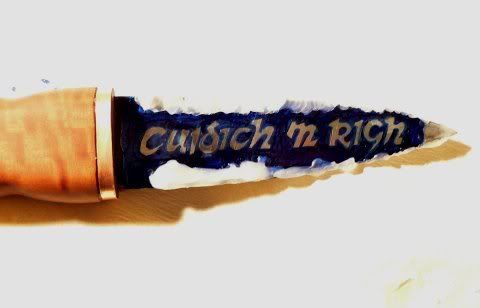
I've also gone back over the lettering with the scriber to clean it up a bit. If you can, check the resist job with a magnifying glass, as any small holes left in the covering will end up as spots on the finished blade. When these are all touched up, paint on the etching solution with a brush, making sure that each section gets fully covered. Go & have a coffee & put your feet up: it takes at least an hour for the acid to do it's job.
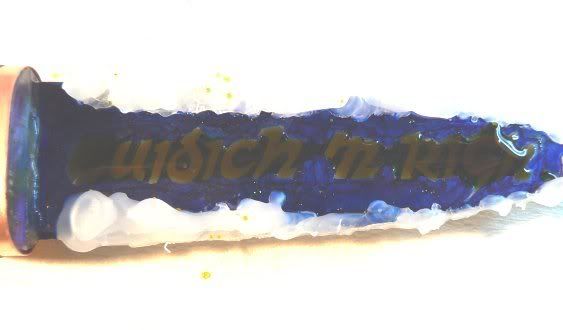
After the hour, check the progress, & if you're satisfied, thoroughly rinse the solution off. For a darker, deeper finish leave the solution in place for a longer period before rinsing.The blue resist ink is easily removed with white spirits. Rub the blade down with beeswax to stop the reaction, & there you have it: a new patterned blade! I'll have the pics of the finished blade up very soon.
-
-
Here we go: a couple of pics of the finished etch under varying light conditions. This one turned out quite well, with only a couple of bleeds under the etch.

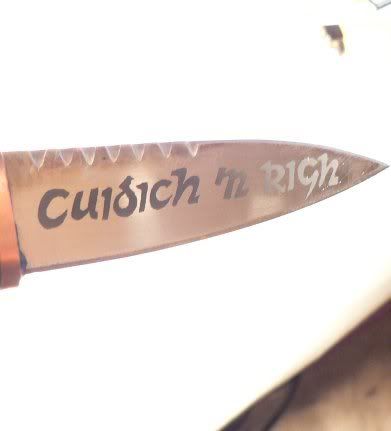
Although the motto was noticably harder to get neat than the other stuff I've tried, it's still a remarkably simple project, & far harder to write about than it is to achieve. The improvement it has made to a pretty plain blade is incredible, & the pen & acid only came to around $30AU, with enough left over to last me years 
-
-
Very nice Raptor! I was toying with how to do this a few months back. Thanks for doing my homework for me   You do great work! You do great work!
-
-
Great job, and nice instruction!
Thanks!
Mark Dockendorf
Left on the Right Coast
-
-
Wow, that came out SWEET!
-
-
Wow that is a really nice piece.
There is a chapter in David Boye's "Step by Step Knifemaking" about acid etching. There are also many amazing pictures in the book of pieces he and a few of his co-knifemakers have worked on. It's an older book, but very well written and worth a look . I picked it up to read before I start my attempt at crafting a Sgian Dubh. I feel it's going to take me many practice attempts before I came remotely close to the lovely one in this thread! 
Thanks for sharing,
Sara
"There is one success- to be able to spend your life your own way."
~Christopher Morley
-
-
Raptor - thank you for this. Now I will have to get to Radio Shack for supplies and try this on some blades.
Brian
In a democracy it's your vote that counts; in feudalism, it's your Count that votes.
-
-
1st June 07, 03:50 PM
#10
You beat me to it!!!!!!!
SIWC,
If I had just scrolled down a bit I wouldn't have had to run into the other room and dig out David Boye's book, It was published by Rodale press. I have used many of the techniqies in the book myself. The chapter on acid etching is detailed and the work pictured is unbelievable. Raptor BTW I use ferric cloride to etch my "cable demascus " knives
Weasel
-
Similar Threads
-
By Riverkilt in forum Miscellaneous Forum
Replies: 25
Last Post: 21st July 06, 06:24 PM
-
By yoippari in forum Miscellaneous Forum
Replies: 7
Last Post: 30th December 05, 08:17 AM
-
By Kid Cossack in forum Contemporary Kilt Wear
Replies: 9
Last Post: 2nd June 05, 10:27 PM
 Posting Permissions
- You may not post new threads
- You may not post replies
- You may not post attachments
- You may not edit your posts
-
Forum Rules
|
|


Bookmarks