|
-
15th February 09, 09:34 AM
#11
 Originally Posted by Chas

I think we can agree, Jock, that ALL British Military capbadges used this type of fitting since Pontius was a Pilot.
Regards
Chas
...and his bodyguard was the Royal Scots! :mrgreen:
Todd
-
-
15th February 09, 10:48 AM
#12
Originally Posted by cajunscot
...and his bodyguard was the Royal Scots! :mrgreen:
Todd
Indeed they were. 
-
-
15th February 09, 11:01 AM
#13
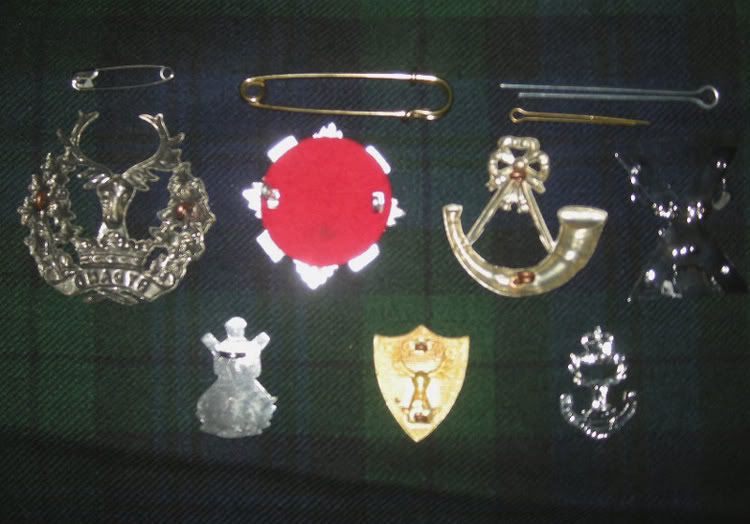
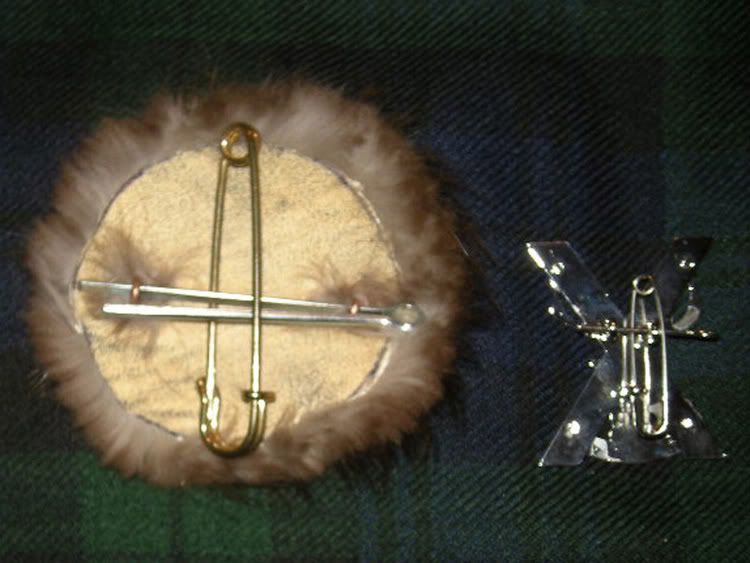
In my collection, I have a couple of badges that fasten this way. If for some reason the pin is missing, one can fasten a badge like this to a bonnet either by stitching it to the cap or fashioning a new pin.
----------------------------------------------[URL="http://www.youtube.com/sirdaniel1975"]
My Youtube Page[/URL]
-
-
15th February 09, 11:10 AM
#14
I have used a bent safetypin to hold the loop shank buttons on my jackets so the buttons can be removed and changed easily. It is not great for buttons because the pin can fold the fabric a little, and also show. It might work out for a cap badge though...
I'm trying to come up with a different design of safetypin for the buttons that does not require the tiny buttonhole, and also does not cause the fabric to fold.
I've also heard of split rings rather than cotter pins being used with that kind of shank on removable buttons.
I tried to ask my inner curmudgeon before posting, but he sprayed me with the garden hose
Yes, I have squirrels in my brain
-
-
15th February 09, 01:05 PM
#15
Originally Posted by Chas
The Navy - ah yes. What is they say? That trueism? I remember - "Old sailors never die - they only smell that way"
Regards
Chas
I thought it was "Old sailors never die, they just get a little Dinghy!"
Scotchmaster
ALBA GU BRATH!
-
-
15th February 09, 01:27 PM
#16
That's even better than mine!!!
Regards
Chas
-
-
16th February 09, 06:46 PM
#17
Last edited by puffer; 16th February 09 at 07:01 PM.
-
-
16th February 09, 06:55 PM
#18
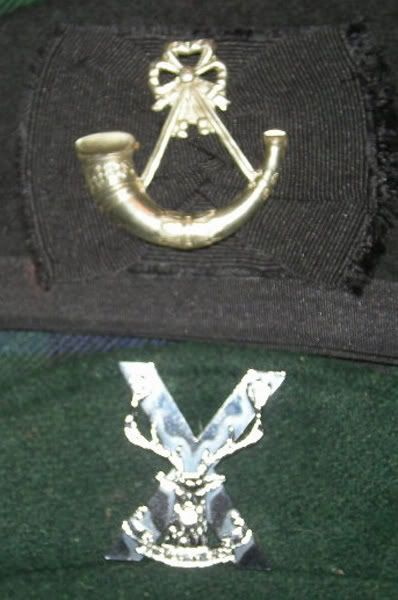
Hey, wow -- a "crucified moose" of the (51st) Highland Brigade!
The Argylls refused to wear those things in Aden back in the 60's:
http://www.britains-smallwars.com/Aden/700.htm
Sorry...back on topic now!
T.
-
-
16th February 09, 07:06 PM
#19
Thanks, Puffer. I don't like the idea of putting holes in fabric for things like this, and I would think the hole would probably need to be stitched to keep it from un raveling.
I have been looking into using a thin wire, like an high E guitar string, that is bent into a "U" shape. The wire should be thin enough to pass through the fabric, I'm thinking of buttons on a jacket, without harm to the fabric.
The wire is then crimped together on the inside. You would have to use new wire with each change of item, but it would not require any holes. I'm guessing that thicker wire could be used on a bonnet, but the ends of the wire need to not be jagged in any way to go through the fabric well.
I tried to ask my inner curmudgeon before posting, but he sprayed me with the garden hose
Yes, I have squirrels in my brain
-
-
16th February 09, 07:16 PM
#20
Originally Posted by cajunscot
YEP !
?????? was it because of the "crest' or the "TRIANGULAR" form off mounting ( an ABORTION DREAMED UP BY, IMHO, A "DESK JOCKEY" (this is not the term I want to use, but being a family friendly forum ?),
Puffer
-
Similar Threads
-
By runewolf in forum DIY Showroom
Replies: 34
Last Post: 11th March 09, 01:43 AM
-
By Squeaky McMurdo in forum DIY Showroom
Replies: 6
Last Post: 29th October 08, 07:17 PM
-
By BonnieDundee in forum General Kilt Talk
Replies: 4
Last Post: 28th March 08, 10:35 PM
-
By Freelander Sporrano in forum Show us your pics
Replies: 4
Last Post: 5th September 04, 03:15 PM
Tags for this Thread
 Posting Permissions
- You may not post new threads
- You may not post replies
- You may not post attachments
- You may not edit your posts
-
Forum Rules
|
|


Bookmarks