|
-
25th April 20, 02:01 AM
#1
Ive made at least 100-150 masks (probably more)
They are for myself, friends, family and I have a little stall set up on the lawn for all the neighbours to grab 1-2 as they walk past.
And yet my fabric stash hasnt really decreased.
Dont bother with the wire, its a pain to put in, doesnt wash well and is uncomfortable.
Instead - On the inside after sewing the two fabrics together, at the top, run a couple rows of shirring... from mid cheek, over the nose to mid cheek in the seam allowance.
Turn through and construct as usual.
Its much more comfortable and fits tighter than the wire method.
(This is for the shaped mask style - the square pleated style doesnt need it)
Theyre so easy once youve made a few, that I now have one for every outfit & colour combination in my wardrobe.
Todays masks for my friends and myself were the Matilda Poppy (for the returned service men & women) as its ANZAC Day here and we had to have the dawn service in our driveways with lamps and the Last Post/ Revile playing on our phones.
-
The Following 2 Users say 'Aye' to Lady Grey For This Useful Post:
-
25th April 20, 02:06 AM
#2
Oh....
You may want to try this for a beard
https://cabfacf6-07d2-4904-a9ac-382f...26a3cbd647.pdf
Again I used 2 rows of shirring in the seam allowance at the bottom for fit.
It was overly complicated construction in my opinion
-
The Following User Says 'Aye' to Lady Grey For This Useful Post:
-
25th April 20, 08:50 AM
#3
Had to search for information about “ shirring”, and found this article, which seems to explain it well ( now I just need elastic thread, with the fabric stores all closed :0(
https://www.seamwork.com/issues/2017...astic-shirring
waulk softly and carry a big schtick
-
-
25th April 20, 07:59 PM
#4
 Originally Posted by Lady Grey

Don’t bother with the wire, it’s a pain to put in, doesn’t wash well and is uncomfortable.
Instead - On the inside after sewing the two fabrics together, at the top, run a couple rows of shirring... from mid cheek, over the nose to mid cheek in the seam allowance.
Turn through and construct as usual.
It’s much more comfortable and fits tighter than the wire method.
(This is for the shaped mask style - the square pleated style doesn’t need it)
Do you happen to have a photo of what this looks like? I'm having a hard time visualizing it. I need something tight against my nose to help keep the glasses from fogging up, but haven't been fond of the wire marks left even by my soft-plastic-coated wire... as I've not put wires in all of my masks yet, I'm open to entertaining other ideas. (FWIW, I used the Olson pattern.)
(And to answer the OP-- yes, I've made my own, plus a couple for a friend who needed them... and no, I'm never making another one as it took me so !#*$@& long! {And, for that reason, I will probably wear the ones I have until they fall apart, even long after this thing is over, lol.})
Last edited by Katia; 25th April 20 at 08:01 PM.
Here's tae us - / Wha's like us - / Damn few - / And they're a' deid - /
Mair's the pity!
-
-
25th April 20, 09:04 PM
#5
Katia
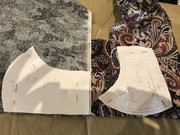
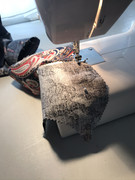
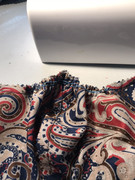
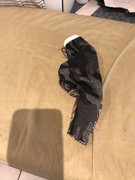
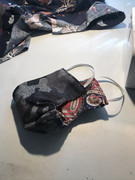
Phew.... took a while mucking around to get the photos- and Willie the Wonder Dog wanted to join in!

The Paisley I extended the length about 1/2inch to be more comfortable under my chin.
The blk/wht flowers is the normal adult size
Just wanted to show off the Matilda Poppy one...cause!
Let me know if you want me to take a picture with shirring as I sew it?
As to glasses.... I dont think there is much of a solution. Drives me mad with sunglasses walking the dog.
Ive heard the same complaint from Doctors & Nurses. (I put my reading glasses on and they started to fog.)
I did see a pattern for one shaped for glasses, Ill try to find it and link.
Hope that helps
-
The Following 2 Users say 'Aye' to Lady Grey For This Useful Post:
-
25th April 20, 09:11 PM
#6
-
-
26th April 20, 12:04 PM
#7
Originally Posted by Lady Grey
Katia
Phew.... took a while mucking around to get the photos- and Willie the Wonder Dog wanted to join in!
The Paisley I extended the length about 1/2inch to be more comfortable under my chin.
The blk/wht flowers is the normal adult size
Just wanted to show off the Matilda Poppy one...’cause!
Let me know if you want me to take a picture with shirring as I sew it?
As to glasses.... I don’t think there is much of a solution. Drives me mad with sunglasses walking the dog.
I’ve heard the same complaint from Doctors & Nurses. (I put my reading glasses on and they started to fog.)
I did see a pattern for one shaped for glasses, I’ll try to find it and link.
Hope that helps
Yes, I think I see. Thanks for taking the pictures! I know how time-consuming mucking about with them can be, so I appreciate it. Did you use elastic thread as mentioned above? I'm not 100% certain how you constructed it but I think I could figure something out now that I've see it up close. (I modified the chin on my masks by adding darts, as I had a gap otherwise. This is surprising because my jaw is more square than pointy, but I also have a small face so that could be it.)
Willie is such a cutie!
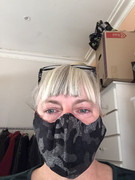
Yes, I'll never find a perfect solution. Even with a nose wire, my glasses fog a tiny bit, especially after I've worn the mask a while (I assume it gets damp-ish from my breath). Sometimes I find breathing out through my nose helps attenuate it a bit (I'm normally a mouth breather). I'll have to try the "flute breathing" technique. THe good thing about it is that unlike playing the flute, I can make this as extreme as I want... I just tried it with pulling my bottom lip under my upper lip and even teeth so it's like I'm breathing down over my chin (a person with an overbite would have no issue with this at all... I bet Freddie Mercury's glasses wouldn't fog!). I'm not sure I want to try the soapy-water technique, though... soap scum is annoying enough on my shower without also having it on my glasses... but I might try the spit trick (it's common for swim goggles/dive masks, and I'm not sure why one of the articles discourages it since it's my spit), or vinegar (though I'm not sure if that's healthy for the anti-glare coating on my glasses).
I discovered that with my sunglasses, though, all bets are off. (My sunglasses are the type that goes over my regular glasses; my lenses are too thick for the clip-on type to work very well anymore. So, they're slightly larger than my regular glasses, and this is apparently just enough overlap to cause fogging issues.)
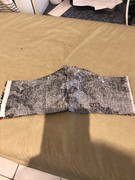
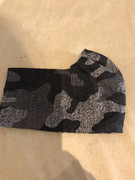
Here are my masks (not shown are the two I made for my friend, which are entirely of the light-blue-with-stars pattern you see on the inside of the navy-blue-with-stars mask at upper right):

Here's tae us - / Wha's like us - / Damn few - / And they're a' deid - /
Mair's the pity!
-
The Following User Says 'Aye' to Katia For This Useful Post:
-
26th April 20, 03:27 PM
#8
Wonderful information! My sweetie, @carolinanan117, finds this very helpful. Thanks!
Allen Sinclair, FSAScot
Eastern Region Vice President
North Carolina Commissioner
Clan Sinclair Association (USA)
-
-
26th April 20, 05:23 PM
#9
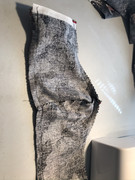
Here we go... the boredom is real!
Picture heavy but heres the basics.
Cut 2 suitable fabrics right sides together
Stick a pin in to keep together and go to the sewing machine
I chain sew them with a few reverse stitches to hold them (this isnt couture sewing)
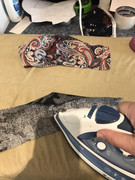
Back to the ironing board
Press to set the stitches

Then press open to one side
Pin the 2 pieces right sides together along the top (and bottom if you wish)
Back to the machine and sew top & bottom

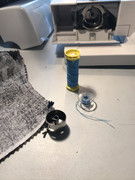
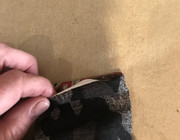
Hand wind shirring elastic on a bobbin and change bobbins
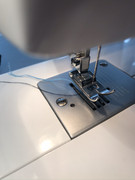
Sew within the top seam from the curve- use a couple of reverse stitches to hold- sew to the curve on the other side.-couple more reverse stitches
Turn and sew back over -staying in the seam allowance - couple more reverse stitches to hold
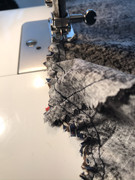
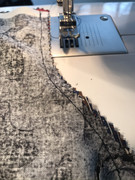
Pic from the wrong side showing the shirring elastic
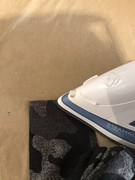
Back to the ironing board
Turn through to the right side
Carefully iron to make it neat along the top and bottom seams- dont worry about pressing the area that was stirred perfectly
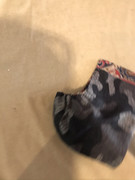
On the open sides turn under and press - sides even (this can be a reversible mask)
Back to the sewing machine (remember to change the bobbin back)
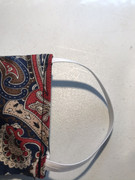
Cut 2 lengths of elastic that will go over the ears- or cords or ties or ribbon or whatever
Tuck in one end and start sewing -making sure to reverse backwards & forwards 2-4 times

Sew towards the end tucking in the other end of elastic or whatever youre using
(Be careful not to twist the elastic)
Remember to reverse a few times
Do the other side
Look FABULOUS
-
The Following 7 Users say 'Aye' to Lady Grey For This Useful Post:
-
27th April 20, 09:15 AM
#10
Lots of interesting discussion here for techniques on how to make them, but it doesn't help those of us who don't sew!  My original question was whether some of our DIYers were interested in making them and selling them to forum members, but it sounds like there's not much interest there. I may have to go find a needle and thread and do this by hand with my terrible hand-stitching that looks like a drunk guy did it. My original question was whether some of our DIYers were interested in making them and selling them to forum members, but it sounds like there's not much interest there. I may have to go find a needle and thread and do this by hand with my terrible hand-stitching that looks like a drunk guy did it.
I've been searching around some more, and I actually think this one may be the best pattern:
https://dhuratadavies.com/blogs/thin...n-and-tutorial
What I like about it is that it has a dart for over the nose as well as under the chin (with an extra stitch line under the chin to flatten it across the width of the chin before it turns under), but each layer is made from only one piece of material. So there's no centre seam that makes it difficult to get good alignment on patterned material. One would only need to press the material with a straight fold along a tartan line, for example, to get the pattern mirrored equally on both sides. This mask pattern seems to get good conformity to face shapes (the pattern has different sizes for a custom fit) while being friendly to a tartan pattern.
-
 Posting Permissions
- You may not post new threads
- You may not post replies
- You may not post attachments
- You may not edit your posts
-
Forum Rules
|
|


Bookmarks