|
-
 Originally Posted by Aldisimo

You probably know already that you can serge the inside edge of the waistband so that you don't have to turn it under, and then stitch in the ditch for a more secure hold than stitching by hand on the inside.
If I had a serger, or a machine did a decent overcasting stitch, I might have taken this approach. I don't, though, so I had to fold it up and under. I did stitch in the ditch from the top. And then hand stitched the extra on the inside bottom down.
The waistband is done. I didn't take many photos of the construction. so I'll describe it. Waistband piece is made up of a number of pieces of cord, stitched together with 1/2" seam allowances. The wales run horizontally. It's 6" tall. (It could stand to a bit taller in the center.) It gets stitched, right side to right side, to the outside of the kilt, 1/2" below the top. To the inside, aligned with the bottom of that stitching, is my interfacing. This was called "petticoat interfacing" by the clerk at the fabric store. I don't know if that's a universal name or not though. It's stiff, but fairly lightweight. I used a folded double thickness (folded edge at the bottom. ) I put this on by hand, with really long and ugly stiches.
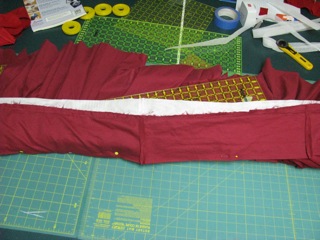
It tapers from 2 1/2" at the center back, to 1 1/2" at the side of my hips, to 1" at the end. Once that was on, i started working on folding the waistband over, and pinning it in place. This is an iterative process, I found. I did a first pass, starting at the center and working out, and then another pass, from the edges to the center, and then a third pass, center to edges. Each time I got it a bit neater, straighter, and tighter. then I took it to the sewing machine, and sewed it from the top, in the ditch. Only broke two sewing machine needles. I'm pretty sure my cat learned some new words.
Here's a picture of the waistband's taper:
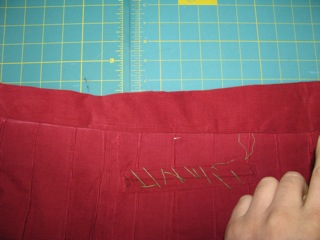
The center is just off the screen (it's where the tip of my index finger is.)
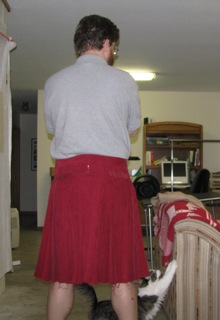
I'm going to work on the closure and belt loops.
-
-
Nobody around to take pictures, so this is the best i can do tonight.
note the helpful cat.
Have to get someone to mark the hem for me tomorrow.
-
Similar Threads
-
By Nighthawk in forum General Kilt Talk
Replies: 33
Last Post: 27th February 09, 08:59 PM
-
By druid in forum How to Accessorize your Kilt
Replies: 6
Last Post: 14th October 08, 10:15 PM
-
By turpin in forum Miscellaneous Forum
Replies: 23
Last Post: 10th May 08, 06:19 PM
-
By Tartan Hiker in forum Comments and Suggestions
Replies: 28
Last Post: 8th May 08, 11:31 AM
-
By AckZel in forum Miscellaneous Forum
Replies: 53
Last Post: 22nd January 06, 04:29 PM
 Posting Permissions
- You may not post new threads
- You may not post replies
- You may not post attachments
- You may not edit your posts
-
Forum Rules
|
|


Bookmarks