|
-
13th January 12, 01:12 PM
#1
Re: The Video Thread
OK, Eric...hammer. Three things.
1. catch the ball even further behind you on the right. SUPER exaggerate that. Reach back behind your to "catch" the hammer as it comes around. This gives you a longer arc through which you can accelerate the hammer.
2. good job, you're not busting a gut to wind it fast on the first and second wind. That gives you somewhere to go with the third wind. But then, when you get to #3, you gotta GO. Pull the snot outta that thing, fast, fast, fast.
3. Head up at the delivery. Seriously, look straight up in the air. Look at your video. Now look at these pictures.
Dan McKim at Enumclaw

HB III
http://www.flickr.com/photos/gertie_du/3800845690/
Dan McKim, again

Adriane Blewitt

Look straight up into the sky as you pull to the finish. Watch Heather MacDonald, she has kickbutt hammer delivery. If she'd slow down her first wind and quit laying back as she pulls, she'd have 90 foot hammers, easy.
and finally...totally insane picture of my mentor...Mike Pockoski, just for fun
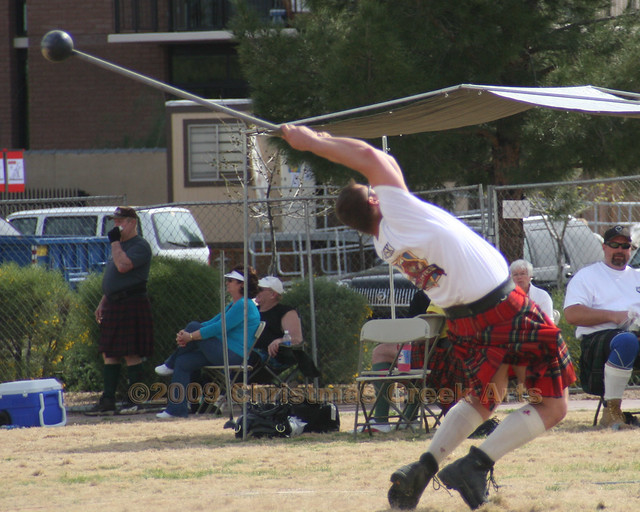
HOW NOT TO DO IT.....
I actually know this woman...nice gal. I like her. But rotten hammer delivery.


-
-
13th January 12, 05:03 PM
#2
Re: The Video Thread
Awesome Tips, Alan!! Thanks - can't wait to try to implement this on Sunday!
-
-
13th January 12, 11:36 PM
#3
Re: The Video Thread
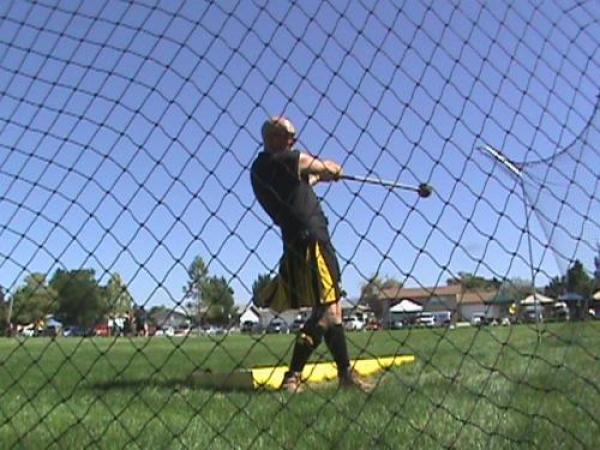
You're also pulling in (short-arming) your hammer release.
Seeing as how you're using DBs for throwing weights, is it safe to assume you don't have any throwing weights? If yes, we can show you how to make some of your own from weight plates, sched 80 pvc, hardware fittings (washers, nuts, 5/8" bolts), chain, quick links or shackles, and such.
Here's an example of the type of weights I build...

This is a 16 lb chain handled hammer. It's a training tool that teaches you throw with your hips rather than your arms (full body winds as opposed to "arm-winding"). This was the only picture I had of my weights that was easily accessible. I can post more later.
Key to this construction is the eye-bolt and the shackle which can bought at any industrial fastener shop. Chain can bought most cheaply at garage sails but Home Depot or Lowes may do in a pinch.
Oh, the 3/4" sched 80 PVC goes around the 5/8" eyebolt shaft and just fits inside a weight plate. Makes everything s o l i d.
The handles may prove to be a problem. If you weld or have a friend who does, you can make your own. You can buy handles mail order for about $20 a piece plus shipping from Bobby Dodd (Mjolnir Hammers Ltd/ Hevy Gear).
Once you get the hang of building practice weights, you make them any size/weight you like. I train with underweight implements to work on speed. You cannot buy an underweight 28 or 56 but you can build one. I have 25, 28, 35, and 42 lb throwing weights. Same thing goes with hammers. I have 10, 12, 14, 15, 16, 19, and 22 lb hammers.
When you get some decent practice weights, I'll show how to use the traffic cone in a technique drill.
-
-
14th January 12, 03:42 PM
#4
Re: The Video Thread
o1d_dude - Thanks a TON!!
I built this today, found all the parts at Lowe's, the total was just under $25. I'll order a D-Handle for Light WFD from Mjolnir. BTW, they're $30, not $20...
Can't wait to try it out...
Thanks again!
-
-
19th February 12, 10:50 AM
#5
-
-
19th February 12, 11:49 AM
#6
Re: The Video Thread
Looks like you had nice weather down at the Queen. Last time I was there, it snowed on the Grapevine and from the Queen you could see snow on all the moutain tops.
Anyway, here are a couple of things I noticed in your videos.
1. In the hammer video you are set up with your heels almost against the trig. That's a bit too close even if you were wearing spikes. Without spikes you should stand about 12-18" away from the trig so you have room to recover after release. With that much recovery room, you will be able to throw with more "violence".
2. In the Widowmaker (HWFD), your technique is fine right up until the second spin. After the first spin, you're stepping through the rotation which slows you down. Ideally, you go slower in the first spin and accelerate the second. Go back and watch the video. See how first your right foot steps and is then followed after a second or two by the left foot? You want to imagine your shoelaces are tied together and try to get both feet down as almost-simultaneously as possible. STICK the left foot down so you can push with the right hip to accelerate the weight.
3. The stone looks pretty good. Just make sure your right hip leads your right shoulder. That's the dreaded "X-position" and is analogous to drawing back on the bow for power.
Good effort and you've got a lot of potential that you haven't tapped into yet. That's a good thing! Harness it and throw far.
-
-
20th February 12, 11:06 AM
#7
Re: The Video Thread
@Eclarkhb
Yup, can see that the First Place mug was properly awarded!
CONGRATULATIONS!!! 
Whoa, those cars look like they're in the danger zone, they didn't seem so close.
-
-
20th February 12, 08:38 PM
#8
Re: The Video Thread
 Originally Posted by GoodGirlGonePlaid

@Eclarkhb
Yup, can see that the First Place mug was properly awarded!
CONGRATULATIONS!!!
Whoa, those cars look like they're in the danger zone, they didn't seem so close.
Hey, I saw you got some medals as well this weekend! Congrats to you too!!
The cars were about 200' away, so they look closer in the pictures, they weren't in danger.
-
-
20th February 12, 08:34 PM
#9
Re: The Video Thread
Originally Posted by o1d_dude
Looks like you had nice weather down at the Queen. Last time I was there, it snowed on the Grapevine and from the Queen you could see snow on all the moutain tops.
Anyway, here are a couple of things I noticed in your videos.
1. In the hammer video you are set up with your heels almost against the trig. That's a bit too close even if you were wearing spikes. Without spikes you should stand about 12-18" away from the trig so you have room to recover after release. With that much recovery room, you will be able to throw with more "violence".
2. In the Widowmaker (HWFD), your technique is fine right up until the second spin. After the first spin, you're stepping through the rotation which slows you down. Ideally, you go slower in the first spin and accelerate the second. Go back and watch the video. See how first your right foot steps and is then followed after a second or two by the left foot? You want to imagine your shoelaces are tied together and try to get both feet down as almost-simultaneously as possible. STICK the left foot down so you can push with the right hip to accelerate the weight.
3. The stone looks pretty good. Just make sure your right hip leads your right shoulder. That's the dreaded "X-position" and is analogous to drawing back on the bow for power.
Good effort and you've got a lot of potential that you haven't tapped into yet. That's a good thing! Harness it and throw far.
Thanks for the tips - I appreciate it!
-
-
20th February 12, 08:54 PM
#10
Re: The Video Thread
Two thumbs up on everything....just SO much better than Ventura. Now you get to go get beat up in the B's for a while!
-
Similar Threads
-
By ForresterModern in forum General Kilt Talk
Replies: 20
Last Post: 12th May 09, 09:36 AM
 Posting Permissions
- You may not post new threads
- You may not post replies
- You may not post attachments
- You may not edit your posts
-
Forum Rules
|
|


Bookmarks