|
-
4th April 06, 05:05 PM
#1
Military box pleat trial
I thought I'd try my hand at fashioning a military box pleat kilt from some inexpensive wool-mix obtained on eBay. The pictures below show the pleating process that seemed to work. It is much more labor intensive than straight knife pleats.
pic #1 - Mark and sew the tapers (suppressions) as normal, except DO NOT fold the next pleat behind the current pleat before stitching. In this kilt, twenty 1-inch pleats at the hip, tapering to 3/4+ inch at the waist.
pic #2 - Carefully baste down the left edge of each pleat (two thicknesses) to set it and hold it for pressing later. This step makes it look like the pleats are backwards from normal.
pic #3 - Baste down the right edge of each 1-inch box, picking up two thicknesses only. Needn't be so careful of the line because this step is only to ensure that the second thickness stays "tucked in" when the underneath part of the pleat is turned the other direction.
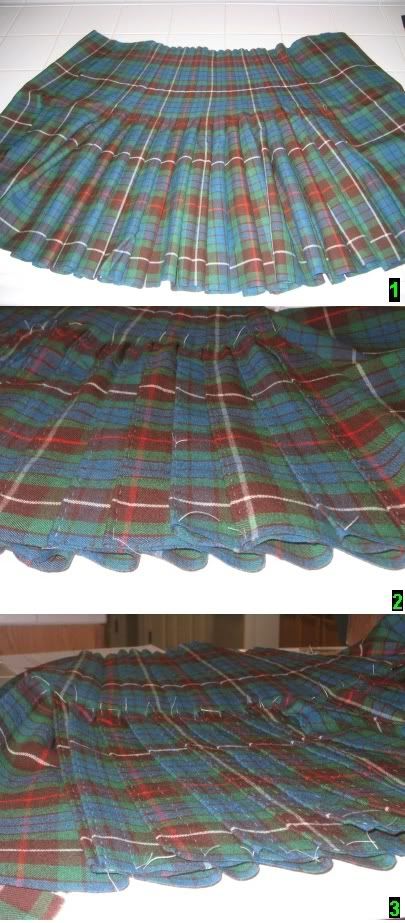
pic #4 - Each pleat is individually pressed about 2/3 the distance from selvedge toward the fell. "Eyeball" the centering of the stripe during pressing.
pic #5 - Stitch in lines of tailor stitching at selvedge and every few inches up toward the fell. The lines start easily with the pressed pleats and become more difficult in the unpressed portion toward the fell.
pic #6 - bottom edge of kilt, to show the intricate overlays of fabric.
I'm having a lot of fun doing this kilt. Because I do not have enough fabric for two aprons, the second part of this experiment is that this kilt will have a patchwork apron made from upholstery leather scrap. A coworker likes the reverse (suede) side of the apron better than the front side, so I'll post a pic tomorrow and let other experts (X-Marks) voice their choice.
"Listen Men.... You are no longer bound down to the unmanly dress of the Lowlander." 1782 Repeal.
* * * * *
Lady From Hell vs Neighbor From Hell @ [url]http://way2noisy.blogspot.com[/url]
-
-
4th April 06, 05:30 PM
#2
Ok... I'm impressed! I can't wait to see part two of your photos tomorrow.
-
-
5th April 06, 09:21 AM
#3
Choose the leather apron - front or back
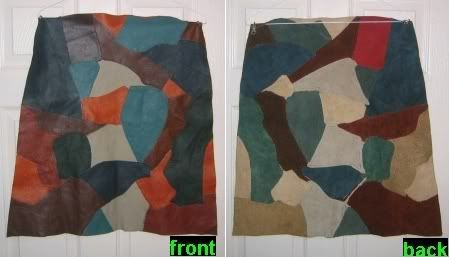
So, which side of the apron would look better with the kilt above - the smooth, shiny front or the sueded back?
As mentioned, there is not enough fabric for two aprons, so I constructed this patchwork apron from upholstery leather scraps. First, the pieces were arranged, glued together, and allowed to dry. A regular home sewing machine was then used to sew the seams because glue alone does not do the job. Afterward all the pieces, both sides, were trimmed to 1/4 inch (+/-) from the seams. Waist, hip, and flare were marked and the apron cut.
"Listen Men.... You are no longer bound down to the unmanly dress of the Lowlander." 1782 Repeal.
* * * * *
Lady From Hell vs Neighbor From Hell @ [url]http://way2noisy.blogspot.com[/url]
-
-
17th April 06, 02:21 PM
#4
The trial continues...
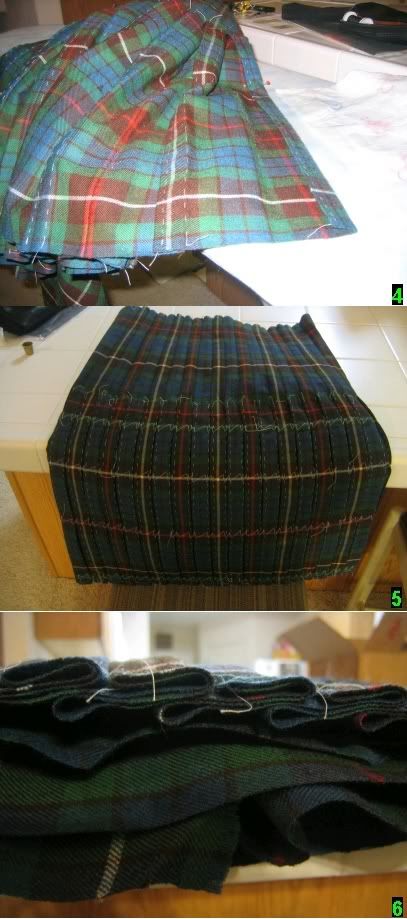
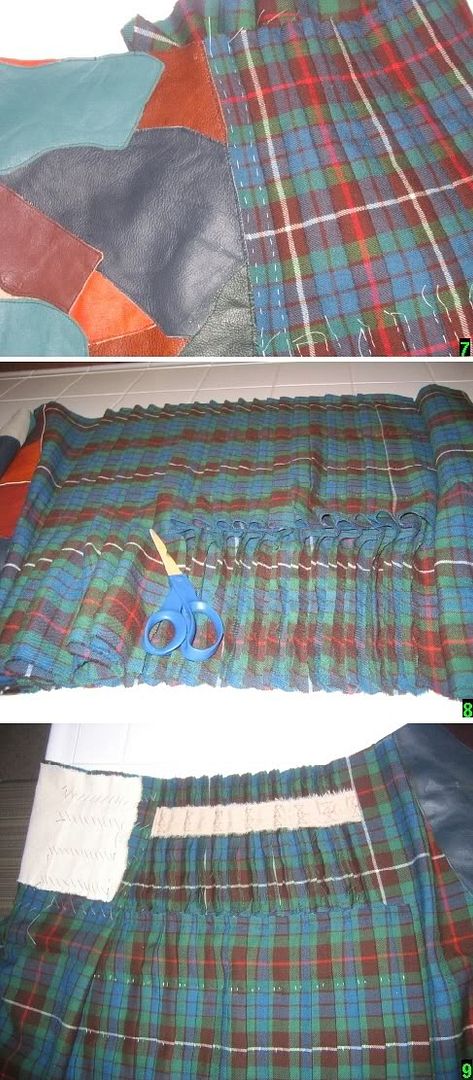
pic #7 - The leather apron is stitched onto the edge of the first tapered pleat from hip to top of kilt. Since there were no opinions expressed on showing the front or back of the leather, I went ahead with my original intention of using the front. Also, I was about 4" short of material for the deep pleat behind the apron, so it took me a while to join in another piece of wool fabric, which should be completely hidden from view.
pic #8 - The excess fabric is cut out. *This is where I made a mistake.* With normal knife pleats, the next pleat is folded down behind before stitching the current pleat, thus producing multiple layers of fabric which is NOT cut out. I sewed these box pleats down individually (with no pleat folded in behind) so when I cut out the excess, the only material remaining besides the outside layer is the 1/2 +/- seam allowances. I obviously missed something here because there is not much to sew the stabilizer and canvas to later.
Perhaps a kiltmaker familiar with military box pleats could describe or illustrate the process for me.
pic #9 - Steeking, underapron canvas, and stabilizer stitched in. There will be no canvas under the leather apron, but there will be a nylon taffeta liner to prevent the suede surface from "sticking" to the rough wool-blend underapron.
"Listen Men.... You are no longer bound down to the unmanly dress of the Lowlander." 1782 Repeal.
* * * * *
Lady From Hell vs Neighbor From Hell @ [url]http://way2noisy.blogspot.com[/url]
-
-
17th April 06, 05:30 PM
#5
Holy smokes, you found what looks like Fraser hunting tartan! I'm in the middle of a huge struggle of will power to keep from ordering a kilt in that. Thanks for reminding me  Kilt looks great by the way. Kilt looks great by the way. 
-
-
17th April 06, 06:46 PM
#6
Wow! I can't wait to see it finished.
-
-
Military box pleat a dying technique?
A tidbit of surprising information that appears to fit here.
I stopped by the vendor booth of Geoffrey (Tailor) at the Sac Valley Games in Woodland last weekend and asked if there was a price differential between kilts done in regular knife pleats and those with military box pleats. The answer was that Geoffrey (Tailor) had no one who could do military box pleats, therefore the question was moot.
"Listen Men.... You are no longer bound down to the unmanly dress of the Lowlander." 1782 Repeal.
* * * * *
Lady From Hell vs Neighbor From Hell @ [url]http://way2noisy.blogspot.com[/url]
-
-

 Originally Posted by way2fractious
A tidbit of surprising information that appears to fit here.
I stopped by the vendor booth of Geoffrey (Tailor) at the Sac Valley Games in Woodland last weekend and asked if there was a price differential between kilts done in regular knife pleats and those with military box pleats. The answer was that Geoffrey (Tailor) had no one who could do military box pleats, therefore the question was moot.
LOL Once you finish this kilt you can ask them for a job.
-
-
That is going to be a beautiful kilt - I have some cloth earmarked for a kilt of similar construction, but not such striking pattern.
If I have been in a similar fix, of not having enough material, particularly with the cloth being a rough one, I would have made the apron in the tartan and used a softer toning fabric for the under apron.
I did that with one of my kilts which is now all the same cloth as I have lost weight, but when it needed to be 11 inches larger it was a good way to stretch the available cloth to make something to fit.
I am waiting to get closer to my goal size before attempting anything more complex than simple pleatings.
You might find that with a wool mix ironing on the wrong side will produce a smoother finish.
If you have a scrap of the cloth left try ironing small strips at progressively hotter settings and increasing pressure to see the effect.
-
-
Thanks for the tips, Pleater. The patchwork leather apron came about simply as an experiment. If it fails to meet expectations, I may move the underapron to the top later on.
On my construction question regarding the excess fabric, inside and above the fell, I corresponded with one of our known and respected kiltmakers. The answer was that the techniques involved are proprietary and will not be shared, at least not at this time nor in an open venue.
I guess I will have to continue the attempts to recreate the process, or find some old kilts for deconstruction or reverse engineering. These techniques are how kiltmaker apprentices had to learn the craft in earlier times.
"Listen Men.... You are no longer bound down to the unmanly dress of the Lowlander." 1782 Repeal.
* * * * *
Lady From Hell vs Neighbor From Hell @ [url]http://way2noisy.blogspot.com[/url]
-
 Posting Permissions
- You may not post new threads
- You may not post replies
- You may not post attachments
- You may not edit your posts
-
Forum Rules
|
|


Bookmarks