|
-
4th April 10, 11:32 AM
#1
Sporran Braiding
In an earlier post there was a video of a sporran maker who added a leather lace braid pattern to the face of the sporran he was making. It was a little difficult to see exactly how he did it, but I think I caught enough to get the idea. This past week I've been experimenting on some scrap leather and Saturday and today I put it on the front panel of a sporran I'm working on.
Here are the pics and some explantation. When I have the chance I'll add the link to the video.
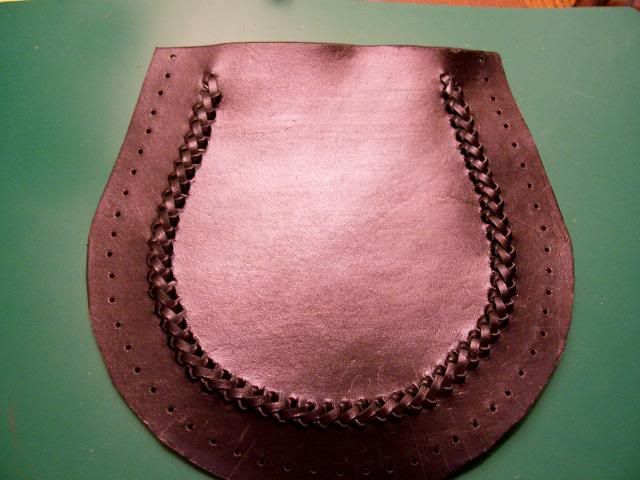
Here is a pic of the finished panel. I've yet to add the gusset. The sporran will be black. I don't have good lighting at my workbench yet.
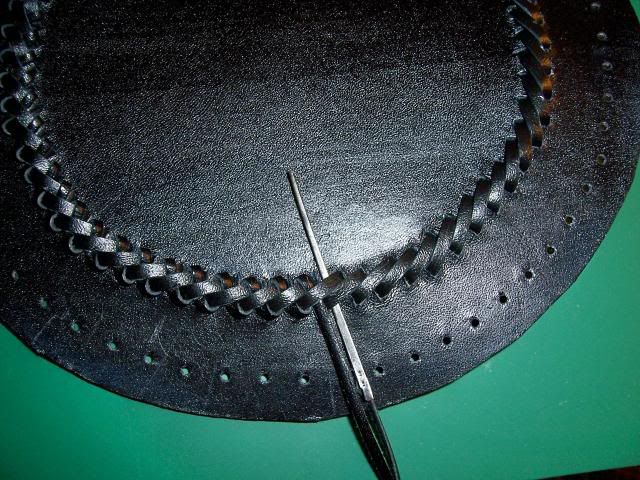
I'm about half-way around here. First step is to put in a double row of parallel stitches. (To make these you make a stitch through two holes then back up halfway on the first stitch and through the leather. It is parallel stiches, but you only use one lace.) You can see these to the right side of the needle.
I used two sizes of lacing. The base course of parallel stitches is 1/8 inch lacing. The top layer (which does not go through the sporran panel) is 3/32 inch lacing. On the above picture, from the outside you go under two of the base layer stitches. On this image, going from the inside out, you go over the inside stitch and under the outside stitch. This is not exactly how the sporran maker did it but I think it looks nice.
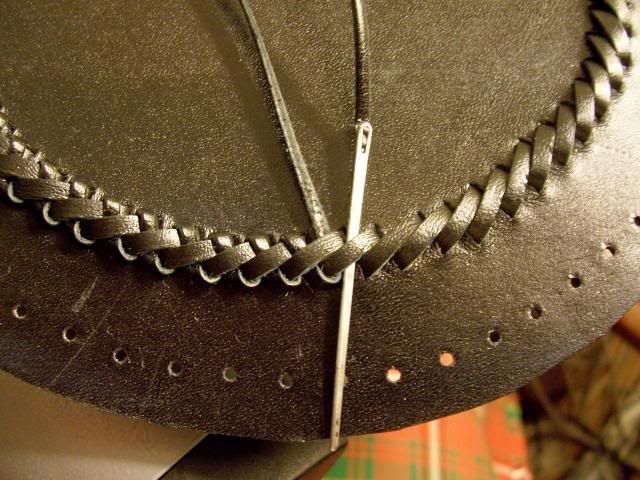
This pic shows the back side of the front panel.
I guessed the amount of lace needed. I was pretty close. I measured the distance at 30 centimeters and pulled off about 120 cm or 4 times the length for the 1/8 inch lace. Should have pulled off about 5 times the length.
For the 3/32 inch lace I pulled off 150 cm and that was about right.
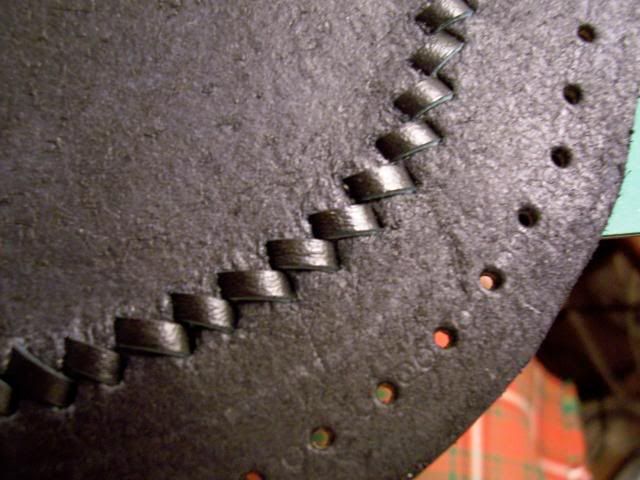
The spacing for the punch holes for the 1/8 inch lace was about 6.5 mm apart.
I scribed a center line and then punched holes with a chisel punch on either side about 6.5 cm apart. This could be stretched to 7mm or 8mm.
It was a lot of work. About 4 hours. And my fingers are sore. But I may use it again in the future.
Hope this might help someone out there who wants to try something different.
Regards,
Tom
You will have to wait awhile to see the finished project. I have carved a new design that I think looks good.
http://ssa.nls.uk/film.cfm?fid=0958
Here is the link for the video clip
Last edited by A Hay; 4th April 10 at 11:34 AM.
Reason: Added a link to sporran making video
-
-
4th April 10, 11:36 AM
#2
-
-
4th April 10, 01:06 PM
#3

Looks great Tom! 
[SIZE="2"][FONT="Georgia"][COLOR="DarkGreen"][B][I]T. E. ("TERRY") HOLMES[/I][/B][/COLOR][/FONT][/SIZE]
[SIZE="1"][FONT="Georgia"][COLOR="DarkGreen"][B][I]proud descendant of the McReynolds/MacRanalds of Ulster & Keppoch, Somerled & Robert the Bruce.[/SIZE]
[SIZE="1"]"Ah, here comes the Bold Highlander. No @rse in his breeks but too proud to tug his forelock..." Rob Roy (1995)[/I][/B][/COLOR][/FONT][/SIZE]
-
-
4th April 10, 02:24 PM
#4
Excellent Tom! I was going to go back and try to decipher that braid myself, and now you've gone and done it for me. I thank you, Sir!
Kilted Teacher and Wilderness Ranger and proud member of Clan Donald, USA
Happy patron of Jack of the Wood Celtic Pub and Highland Brewery in beautiful, walkable, and very kilt-friendly Asheville, NC.
New home of Sierra Nevada AND New Belgium breweries!
-
-
4th April 10, 10:05 PM
#5
Bill,
My hole spacing is a little different from what he had. I need to relook at the video a few more times. The problem I have with the video is if I pause it, another image comes over the original and you can't really see the details of the original. So I had to view it on the fly over and over.
Good luck on your attempts. Perhaps you can find a better way.
Regards,
Tom
-
-
4th April 10, 11:04 PM
#6
Thank goodness for the photos !! When I saw the thread title about braiding, I geared I would see sporrans with beaded corn-row tassels !!
-
-
5th April 10, 08:11 PM
#7
-
-
17th April 10, 11:17 PM
#8
Looking forward to seeing the completed sporran
I'm an 18th century guy born into the 20th century and have been dragged kicking and screaming into the 21st century.
We do not stop playing because we grow old, we grow old because we stop playing"
-
-
17th April 10, 11:54 PM
#9
Great stuff Tom! Looking forward to seeing the finished article.
-
-
24th April 10, 06:20 PM
#10
If you want to slow down the video to capture the detail of what he was doing. use a firefox add on called download helper or download assit. it will allow to rip video from most sites. you can capture the video and play it back , pausing where you wish.
Nice work on the braiding.
-
Similar Threads
-
By bricelythgoe in forum DIY Showroom
Replies: 25
Last Post: 2nd December 09, 04:24 AM
-
By Bart_In_A_Kilt in forum DIY Showroom
Replies: 14
Last Post: 9th March 09, 10:17 AM
-
By Ancienne Alliance in forum Kilt Advice
Replies: 36
Last Post: 7th December 08, 11:16 AM
-
By Giraffe in forum Kilt Advice
Replies: 56
Last Post: 27th March 08, 07:39 PM
-
By phil h in forum How to Accessorize your Kilt
Replies: 16
Last Post: 12th December 04, 10:51 AM
 Posting Permissions
- You may not post new threads
- You may not post replies
- You may not post attachments
- You may not edit your posts
-
Forum Rules
|
|


Bookmarks