|
-
3rd March 09, 09:40 AM
#1
Tux jacket conversion
EDITED "After the dance" -- I am going to make a few changes to the original conversion detailed below, will post that info as I get around to it. All in all, it was a smashing success and can be seen "in action" about 3 or 4 pages into this thread. Briefly, I will say: 1. Check that your new buttons fit through the existing buttonholes in jacket! 2) my complicated "loose" lining is irrelevant in a short jacket, and will be sewn down tightly to the jacket shell, and 3) after adjusting the lining, I will see if the side vents then sit right (they don't, now). If they still don't sit right, I will remove the flaps and sew the vents up again -- they spoil the line of the rear hem, and to my mind give it a casual appearance.
ORIGINAL POST: With the clan dinner dance this weekend (gulp) I'm finally getting around to converting a thrift-store tux find into a formal kilt jacket, or reasonable facsimile. We have a borrowed PC just in case I run out of time or make a total hash of this, so not really as much pressure as you might think!
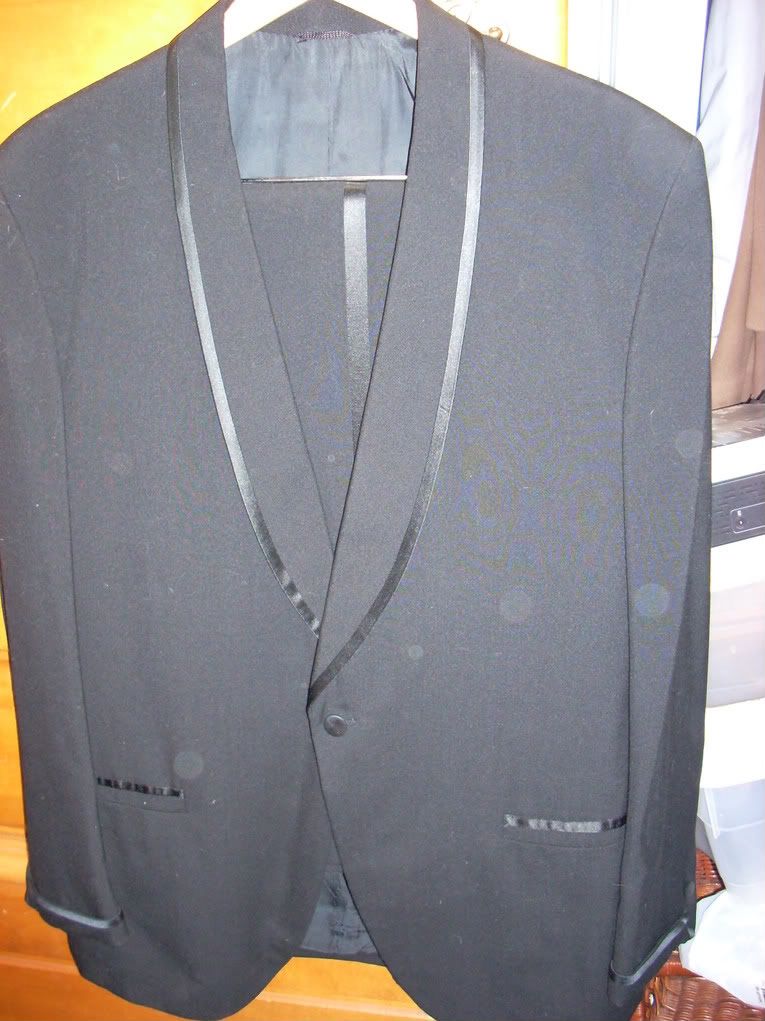
I showed the jacket when we first bought it -- note the shawl collar. . . and pants, so plenty of spare material.
Used the PC to help establish a front cutaway line, then modified it slightly to sit better with the bottom of lapel -- the satin edging curves around to the inside for a short way, so I need to start the cutaway below that.

Sat down with the seam-ripper (and some Guinness) last night and opened 'er up. Boy, this thing has lots of gizzards! My re-tailoring won't be quite as detailed, but I'll try to take and post some more shots as I go along.

One decision that could go either way -- I have the skills and materials to make PC-style sleeve and pocket flaps, but wonder if the "pointy" style will sit well with the shawl collar. I'll pin up some rounded flaps and see if that looks better. It will have round gold anchor buttons when finished -- perhaps another reason to stay with curves.
Oh, the epaulettes! Discovered that the jacket had faux cuffs hand-sewn onto sleeve hems. You can just see them in the first photo. When I removed them, I decided that these beautifully finished, satin-edged pieces would make the perfect epaulette. I'll get a shot of them in the next update.
This is a nicely made suit by "Lord West," complete with U.S. garment worker's union label (no, I wasn't looking for it  ). Got me humming that jingle. . . for those of us old enough to remember when the U.S. had a garment worker's industry worth advertising. . . ). Got me humming that jingle. . . for those of us old enough to remember when the U.S. had a garment worker's industry worth advertising. . .
Wish me luck!
Last edited by sydnie7; 8th March 09 at 01:48 PM.
Proudly Duncan [maternal], MacDonald and MacDaniel [paternal].
-
-
3rd March 09, 10:02 AM
#2
I look forward to seeing the finished article. The ingenuity and skill of some members here never fails to amaze me. I am glad you are going for fabric epaulettes and not those modern plaited string things. I don't know why they all have them nowadays.
-
-
3rd March 09, 10:47 AM
#3
I look forward to seeing your progress.
I believe the Irish Style formal kilt jackets (the name escapes me at the moment) have similar collars.
While I don't mind the braided epaulettes, like Phil I favor the simpler matching fabric ones as being nicer looking.
Cheers
Jamie
-See it there, a white plume
Over the battle - A diamond in the ash
Of the ultimate combustion-My panache
Edmond Rostand
-
-
3rd March 09, 11:00 AM
#4
That looks like you are doing a great job of things-- let me offer a bit of advice, it I may. When you have finished the jacket, take it you a local alteration shop/tailor and have them take in the waist just a tad, so that the jacket has a wee bit of flair as falls over the top of your kilt.
You want to do this because most American jackets (tuxedos, suit coats, sports coats, etc.) are cut boxier than kilt jackets and therefore when converted never hang quite as well as they should.
This same "boxiness" occurs in most of the less expensive (read cheap) off the peg Highland jackets as well, and they greatly benefit from a bit of shaping at the waist.
-
-
3rd March 09, 11:14 AM
#5
 Originally Posted by Panache

[snip] I believe the Irish Style formal kilt jackets (the name escapes me at the moment) have similar collars.
Yes, that's the Brian Boru. I can only find eensie teensie pictures of it, but I believe it has either slash pockets or no front pockets at all. And either no sleeve treatment or a simple slanting cuff with aligned buttons.
Who knows, in interests of time, what this one will look like on its first outing!
MoR, thanks for the reminder about waist shaping. This jacket has side panels (not just front/back pieces) so easier to take a bit in at several places. Again, we'll see what time allows.
No more progress until tonight, as I am "real working" today. Thanks all for the encouragement and suggestions!
Proudly Duncan [maternal], MacDonald and MacDaniel [paternal].
-
-
3rd March 09, 11:38 AM
#6
I'm subscribing to this post in the hopes that you'll continue to update us with lots of photos and narrative descriptions. Us DIY'ers need to stick together
-
-
3rd March 09, 03:11 PM
#7
The Barry
"Confutatis maledictis, flammis acribus addictis;
voca me cum benedictis." -"Dies Irae" (Day of Wrath)
-
-
3rd March 09, 03:21 PM
#8
Wow, is that hair canvas in the third pic? If it is, you found yourself a very well made jacket. Is the jacket material wool?
Wallace Catanach, Kiltmaker
A day without killting is like a day without sunshine.
-
-
3rd March 09, 05:30 PM
#9
Originally Posted by ChattanCat
Wow, is that hair canvas in the third pic? If it is, you found yourself a very well made jacket. Is the jacket material wool?
Yes, it's wool, and yes, that's hair canvas! Plus bias tape around the front edges, and some sort of black flannel-ish inner material that seems to come down out of the lapels. There are at least four different kinds of thread used in construction, too, and evidence of hand-finishing.
Got some more work done and am uploading photos, stay tuned.
Proudly Duncan [maternal], MacDonald and MacDaniel [paternal].
-
-
3rd March 09, 05:58 PM
#10
-
Similar Threads
-
By svc40bt in forum Kilt Advice
Replies: 5
Last Post: 13th October 08, 03:20 AM
-
By Kerr the Walker in forum DIY Showroom
Replies: 8
Last Post: 26th July 08, 06:54 PM
-
By Aracos mac Domhnaill in forum How to Accessorize your Kilt
Replies: 11
Last Post: 9th July 08, 06:38 PM
-
By beloitpiper in forum DIY Showroom
Replies: 26
Last Post: 21st January 08, 07:27 AM
-
By turpin in forum How to Accessorize your Kilt
Replies: 5
Last Post: 19th November 07, 09:47 AM
 Posting Permissions
- You may not post new threads
- You may not post replies
- You may not post attachments
- You may not edit your posts
-
Forum Rules
|
|


Bookmarks